What Is An Enterprise Issuing CA?
An Enterprise Issuing Certificate Authority (CA) is a component within a larger Public Key Infrastructure (PKI) system that is responsible for issuing digital certificates. In the hierarchy of a PKI, the Enterprise Issuing CA is usually a subordinate entity under the Root CA (Certificate Authority), which is the highest level of trust in the PKI. The Root CA is responsible for the creation and management of one or more Issuing CAs.
An Enterprise Issuing CA can issue certificates directly to end entities (like servers, users, or devices), or it can issue certificates to additional subordinate CAs, which then issue certificates to end entities. This creates a multi-tiered, hierarchical trust model that allows for granular control and management of digital certificates within an organization.
In the context of an “enterprise”, this typically refers to a large business or organization that has its own internal PKI. This allows the enterprise to manage its own certificates rather than relying on external, third-party CAs. The advantage of this approach is that it provides the enterprise with complete control over its certificate policies and procedures, allowing it to tailor the PKI to its specific needs.
Reasons Set Up An Enterprise Issuing CA
Setting up an Enterprise Issuing Certificate Authority (CA) can be beneficial for a variety of reasons.
Here are some key motivations:
Control Over Certificate
- Policies: With an internal Enterprise Issuing CA, an organization has full control over its certificate policies.
This includes which types of certificates are issued, who or what can receive them, and how they are managed. This can be important for ensuring that certificate usage aligns with the organization’s security policies and goals. - Cost Efficiency: For organizations that need to issue a large number of certificates, running their own CA can be more cost-effective than purchasing certificates from an external CA. This is especially true if the organization needs to frequently issue, revoke, or renew certificates.
- Fast and Flexible Certificate Issuance: With its own Enterprise Issuing CA, an organization can issue certificates quickly and flexibly without having to go through the process of requesting and waiting for certificates from an external CA.
- Custom Certificate Attributes: Some organizations may have specific needs that require custom certificate attributes. An Enterprise Issuing CA can allow for such customization.
- Improved Security: By managing its own certificates, an organization can ensure that all aspects of its certificate usage, from issuance to revocation, are handled in a secure manner. This can help to prevent security breaches that could occur if certificates were improperly issued or managed.
- Compliance with Industry Regulations: Some industries have regulations that require organizations to use certificates in specific ways. By managing its own Enterprise Issuing CA, an organization can ensure that it complies with these regulations.
Prerequisites To Set Up Enterprise Issuing CA on Windows Platform
To set up an Enterprise Issuing CA on a Windows platform, there are several prerequisites
that must be met before the setup can begin.
The following items must be in place for the Enterprise Issuing CA to work properly:
- Active Directory Domain Services (AD DS) must be installed and configured on the server that will be hosting the Enterprise Issuing CA
- A Domain Controller running Windows Server 2008/2012/2016 or later.
This is necessary for Active Directory authentication and Certificate Services management. - The server must have a static IP address and a fully qualified domain name (FQDN).
- The server must be a member of the domain in which the Enterprise Root CA will be used.
- An administrator account with elevated privileges (local Administrator or delegated rights) for managing the Certificate Services via the Microsoft Management Console (MMC).
- The server must have the necessary software components installed, including the
Microsoft .NET Framework and Internet Information Services (IIS). - A trusted root Certificate Authority (CA) for signing certificates and issuing
certificates from the Enterprise Issuing CA. - A certificate template must be created in the Enterprise Root CA for the Issuing CA
Once these prerequisites are met, the Enterprise Issuing CA can be installed and configured in ADCS.
Note: Enterprise CA should be installed as a Domain Member server.
Make sure the server is joined into the domain. To configure Enterprise Certification
Authority, the user account should be a member of the Domain
Administrator and the Enterprise Administrator.
How to Set Up An Enterprise Issuing CA In ADCS?
An Enterprise Issuing CA setup is a multi-stage process where it need several sub tasks to be done.
We have divided the process into these different stages to make the process easy to learn.
- Pre-Installation Configuration for Enterprise Issuing CA
- Publish the Root CA Certificate and CRL.
- Set up Active Directory Certificate Service (ADCS) Role.
- Submit the request and Issue a certificate for Enterprise issuing CA.
- Install the Issued certificate on Issuing CA server.
- Post-Installation Configuration for Issuing Sub CA.
- Configuring CDP and AIA using GUI.
Let’s get started with pre-installation configurations.
Pre-Installation Configuration for Enterprise Issuing CA
Login to the member server with Administrator permissions

Creating CAPolicy.inf file and updating the configuration
Click on ‘Start’ –> ‘Run’, type ‘notepad C:\Windows\CAPolicy.inf‘, and click on ‘OK’.

It prompts you to create a file. Click on ‘Yes’

Update the CAPolicy.inf file as below configurations:
[Version]

Signature="$Windows NT$"
[PolicyStatementExtension]
Policies=InternalPolicy
[InternalPolicy]
OID= 1.2.3.4.1455.67.89.5
[Certsrv_Server]
RenewalKeyLength=2048
RenewalValidityPeriod=Years
RenewalValidityPeriodUnits=5
LoadDefaultTemplates=0
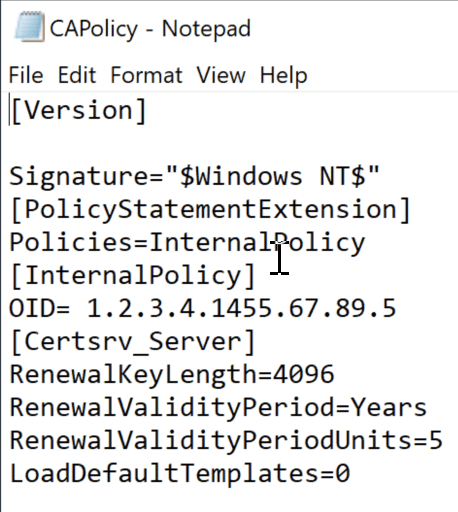
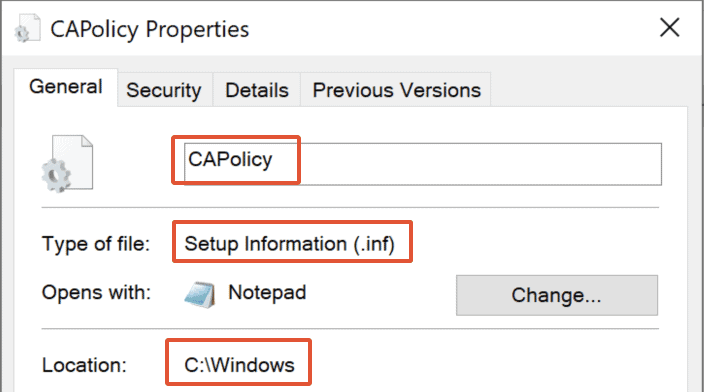
Note: Make sure CAPolicy.inf file with the extension ‘.inf’ (File ends with ‘.inf’). Else it will not be recognized during CA installation.
Publish the Root CA Certificate and CRL
-
Login to the domain member server (IssueSubCA.TheSecMaster.local) as TheSecMaster\Administrator.
-
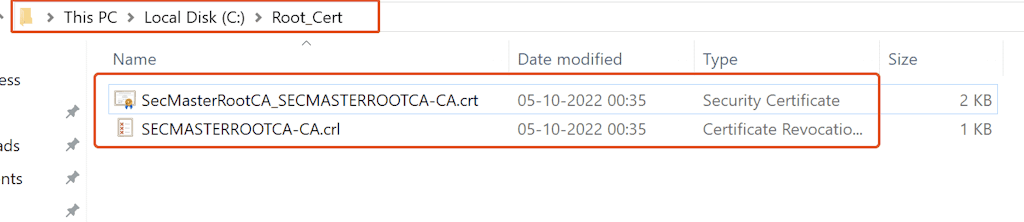
Copy the Root CA certificate (SecMasterRootCA_SECMASTERROOTCA-CA.crt) and the Root CA Certificate Revocation List (SECMASTERROOTCA-CA.crl), which exist in the path: ‘C:\Windows\System32\CertSrv\CertEnroll‘ on the Standalone Root CA server(SecMasterRootCA) to the path: ‘C:\Root_Cert‘ on the member server (IssueSubCA.TheSecMaster.local).
-
Publish Root CA certificate and CRL into Active Directory.
Run the below commands with the administrative command prompt in the domain member server (IssueSubCA.TheSecMaster.local) to publish the Root CA certificate and CRL into Active Directory.
certutil -dspublish -f "C:\Root_Cert\SecMasterRootCA_SECMASTERROOTCA-CA.crt" RootCA
certutil -dspublish -f "C:\Root_Cert\SECMASTERROOTCA-CA.crl" RootCA

-
Add Root CA certificate and CRL into Local Store.
Run the below commands with the administrative command prompt in the domain member server (IssueSubCA.TheSecMaster.local) to Add the Root CA certificate and CRL into Local Store.
certutil -addstore -f root "C:\Root_Cert\SecMasterRootCA_SECMASTERROOTCA-CA.crt"
certutil -addstore -f root "C:\Root_Cert\SECMASTERROOTCA-CA.crl"

How to Install Enterprise Subordinates Issuing CA?
Installing Enterprise Subordinates Issuing CA on the domain member server (IssueSubCA.TheSecMaster.local)
Set up Active Directory Certificate Service (ADCS) Role
Step 1. Open the ‘Add Roles and Features
1. log in to the server with the Administrator privilege (Domain and Enterprise Administrator)
2. Set up Active Directory Certificate Service (ADCS) Role- Open the ‘Add Roles and Features’
Let’s begin this process by setting up the ADCS role. Open the ‘Add Roles and Features’.In Server Manager, go to Manage –> Add Roles and Features.

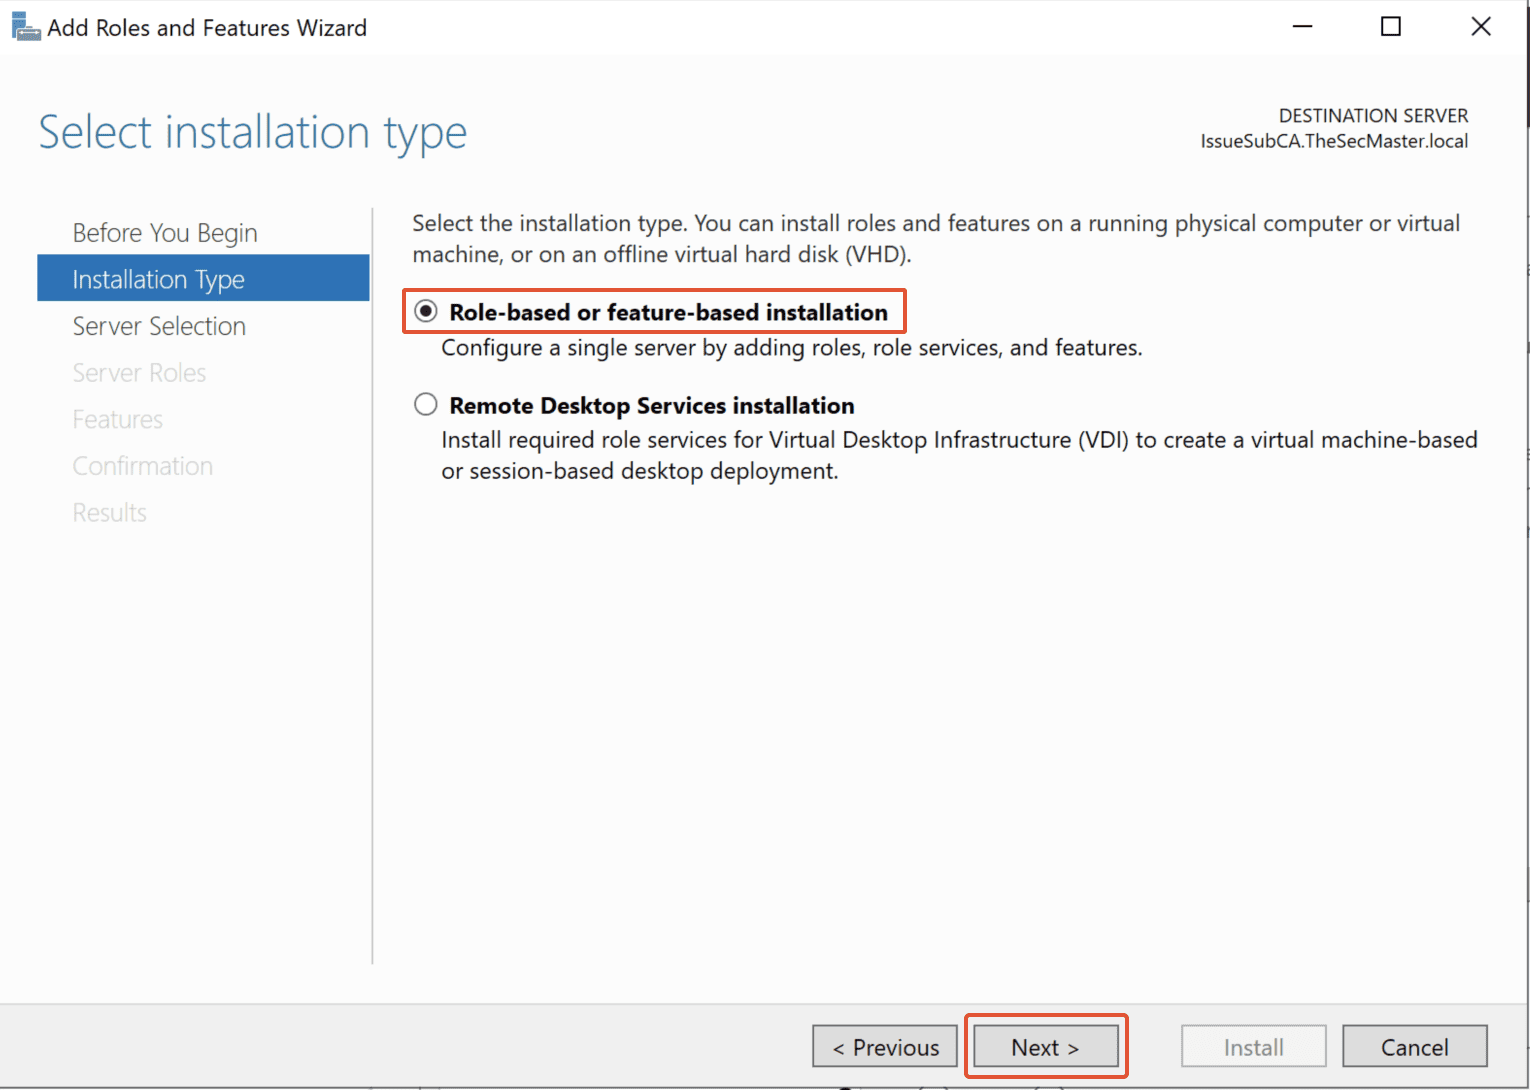
Step 2. Select Role-Based Installation
Click the ‘Next’ button in the ‘Add Roles and Features’ wizard. Select ‘Role-based or Feature-based installation’ since it is role-based.
Click ‘Next.’
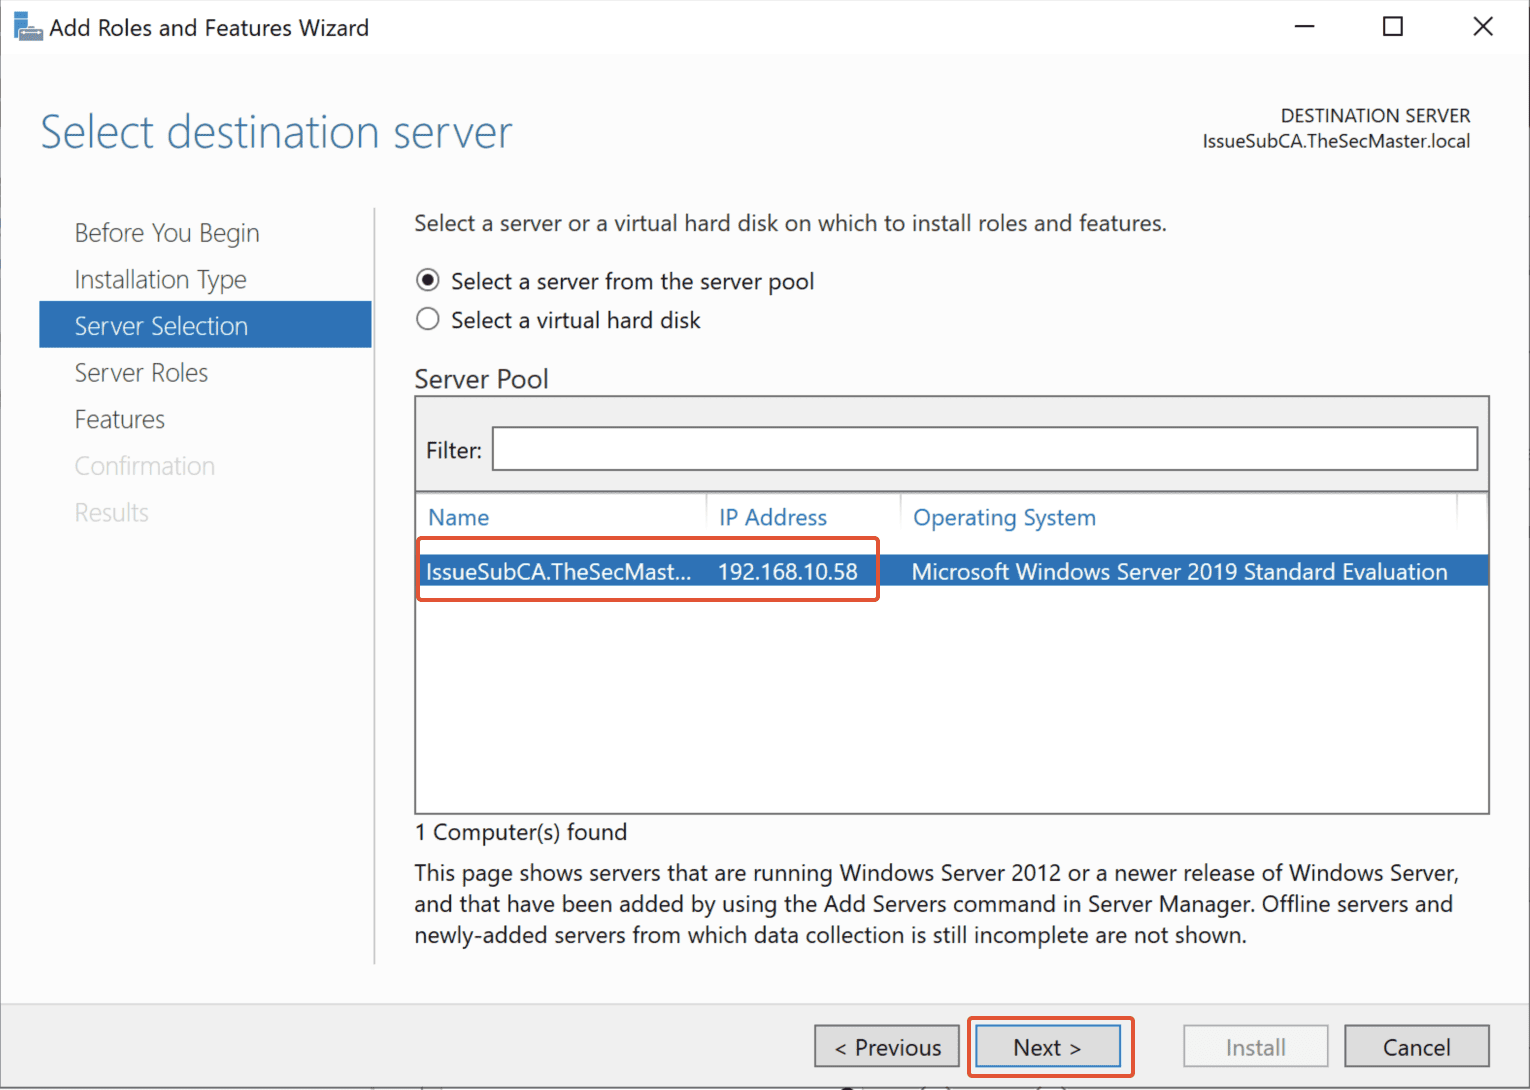
Step 3. Select the Server on which you are going to install the ADCS Role
Since it has only a local server, select that local server, then click Next.
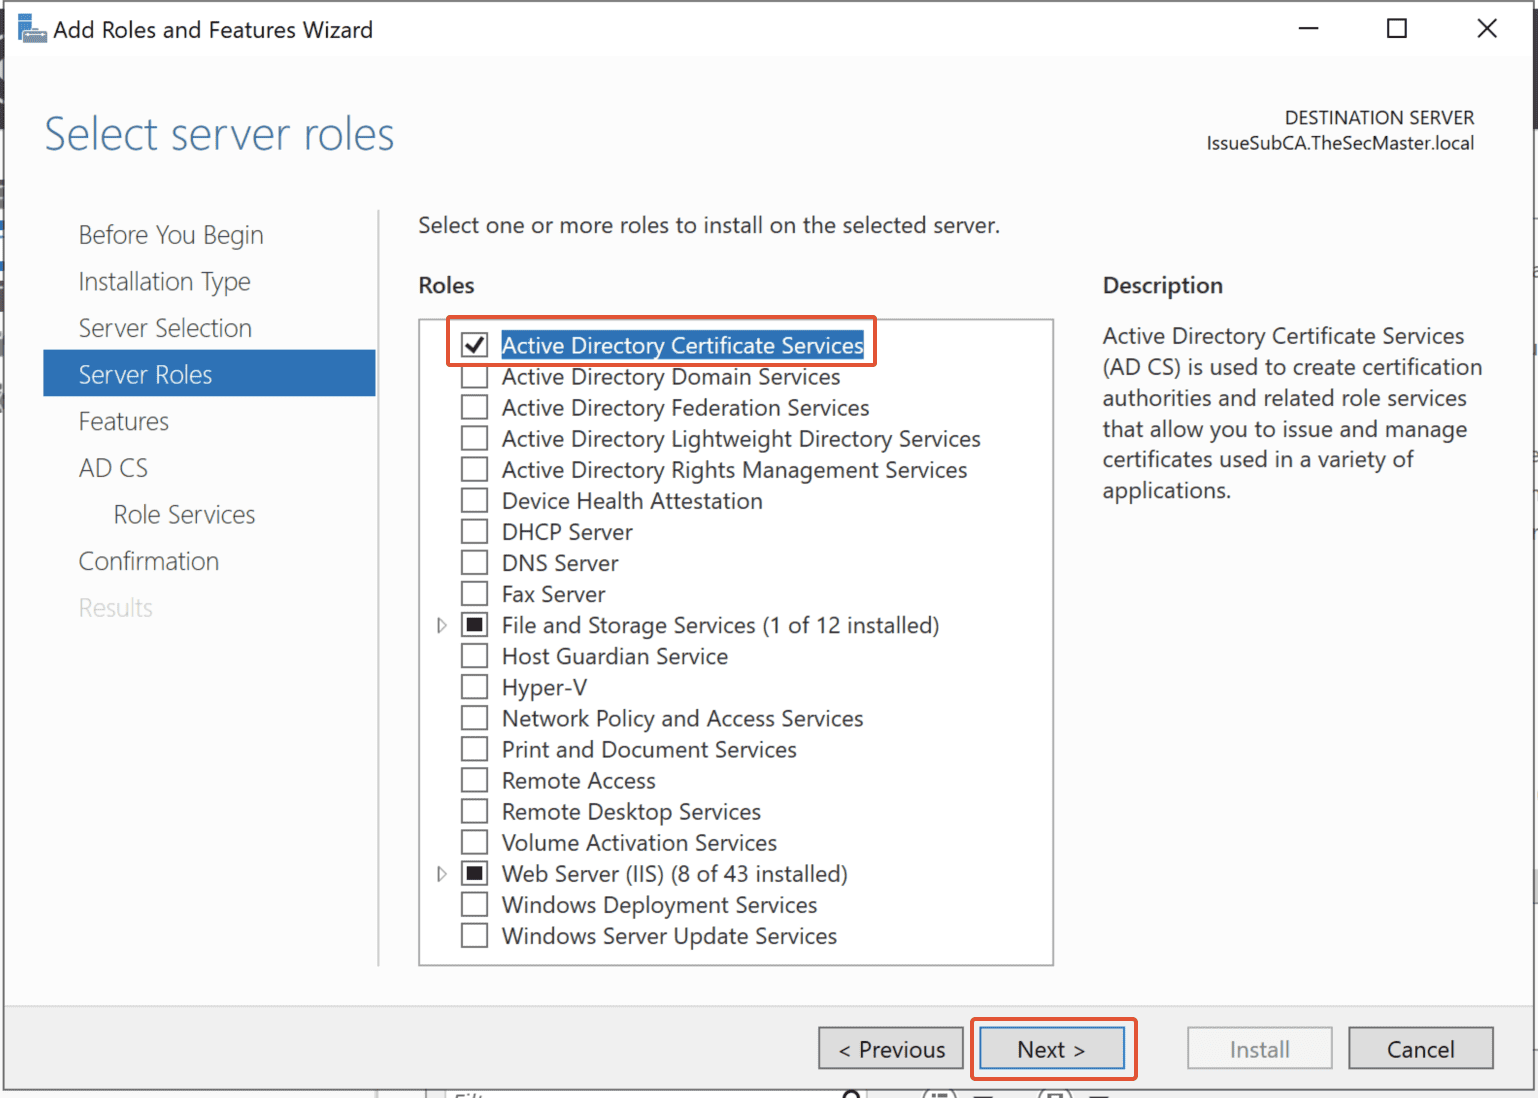
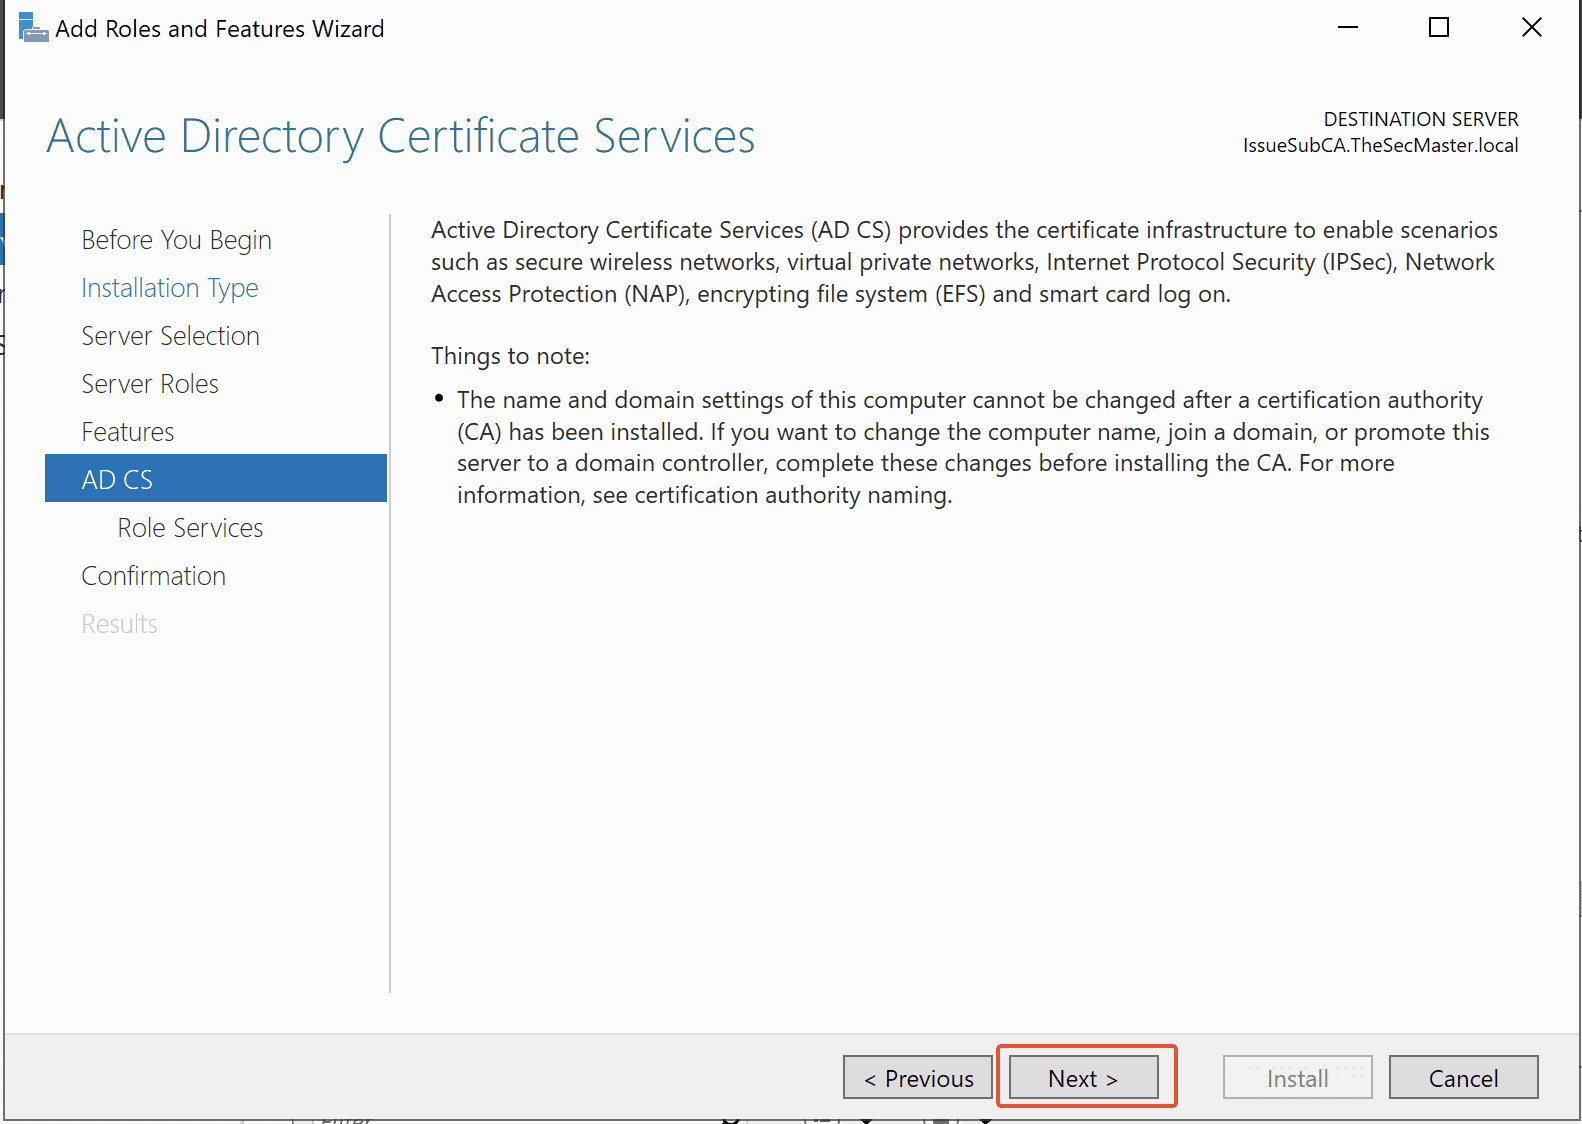
Step 4. Select ‘Active Directory Certificate Services’ role
Select the “Active Directory Certificate Services” role, then click on Next.
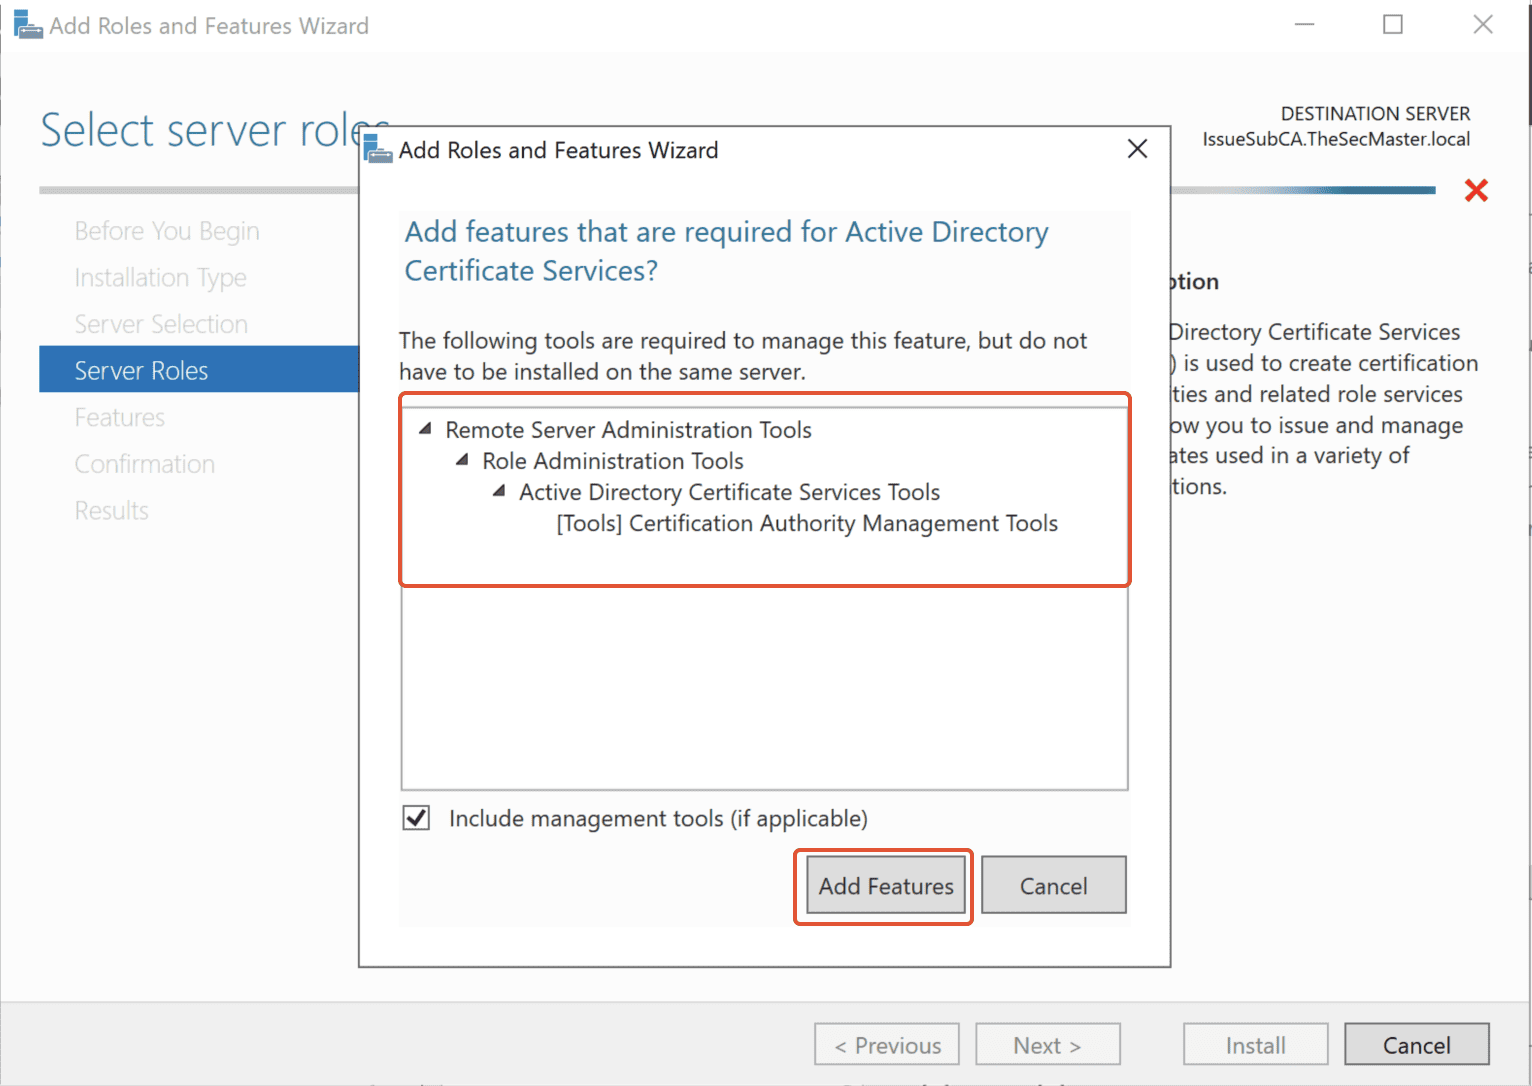
Step 5. Add the ‘Add Features’
Click on the ‘Add Features’ button to add the ADCS features.
Click on Next, and Next again.
Step 6. Select Features
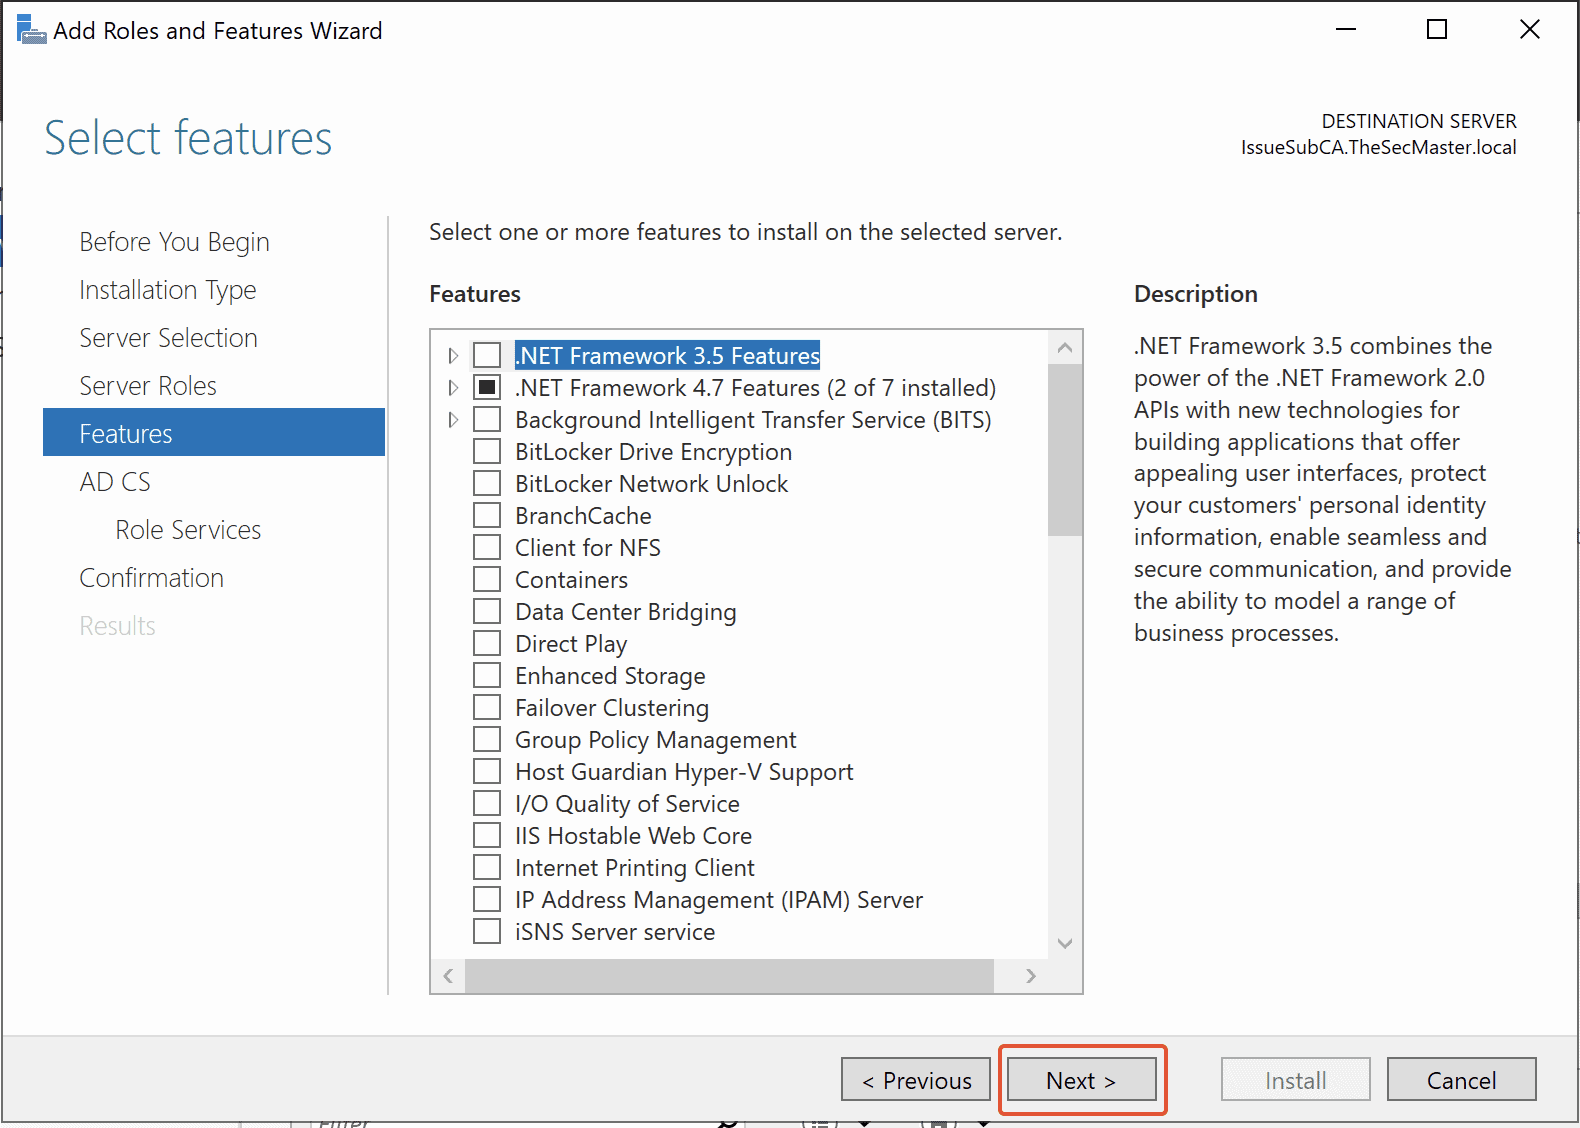
Step 7. Initiate the ADCS installation process
Click on Next, and This will take you to the ADCS installation wizard. Click the Next button to initiate the ADCS installation process.
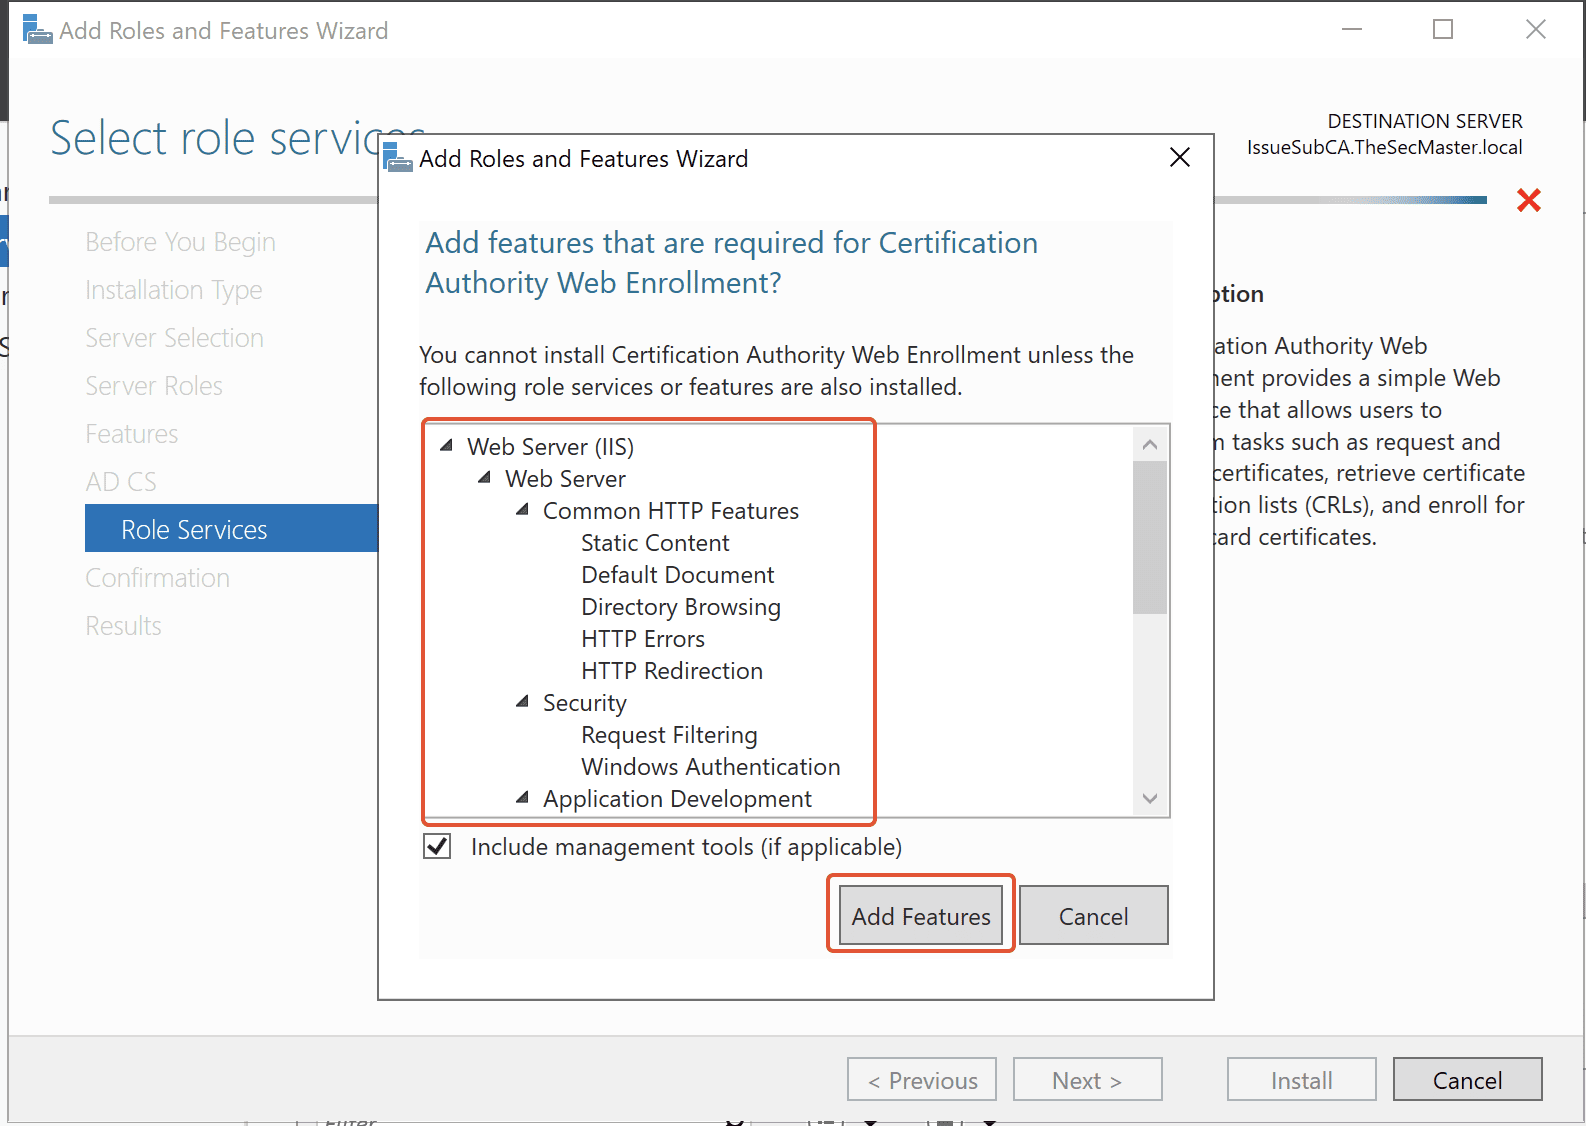
Step 8. Initiate the ADCS installation process and Add Features for Web Enrollment
Click the Next button to initiate the ADCS installation process and Add Features for Web Enrollment.
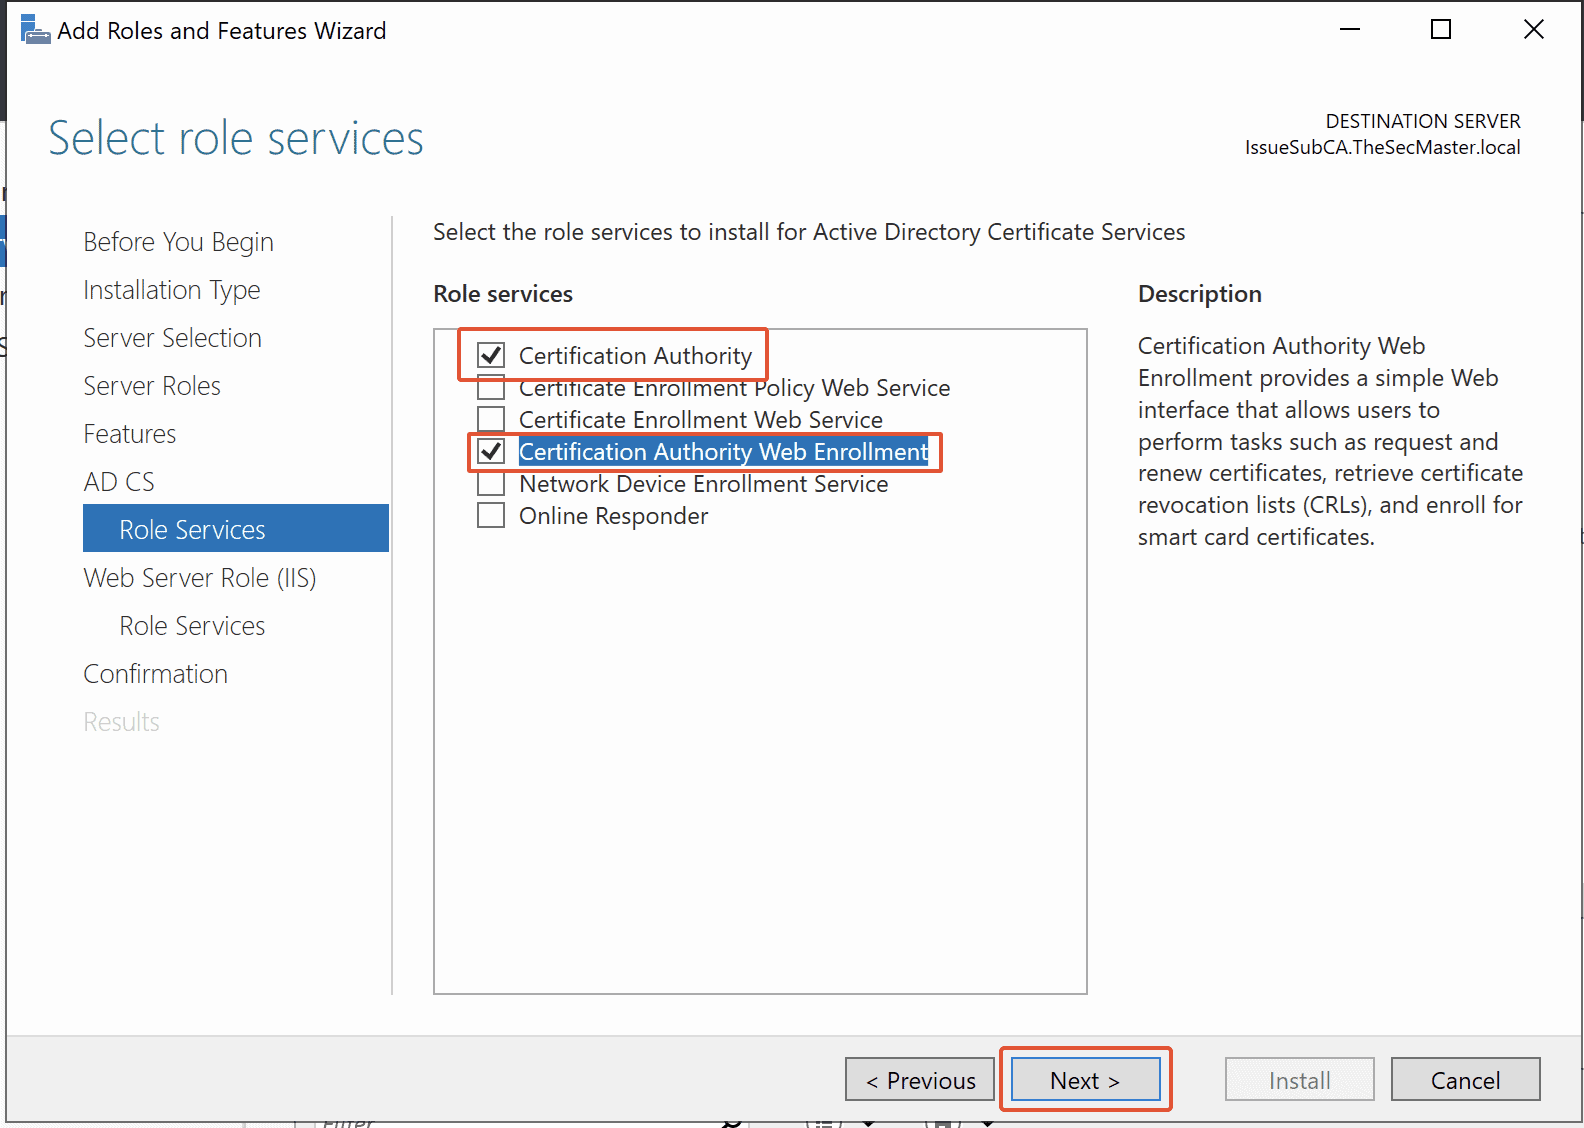
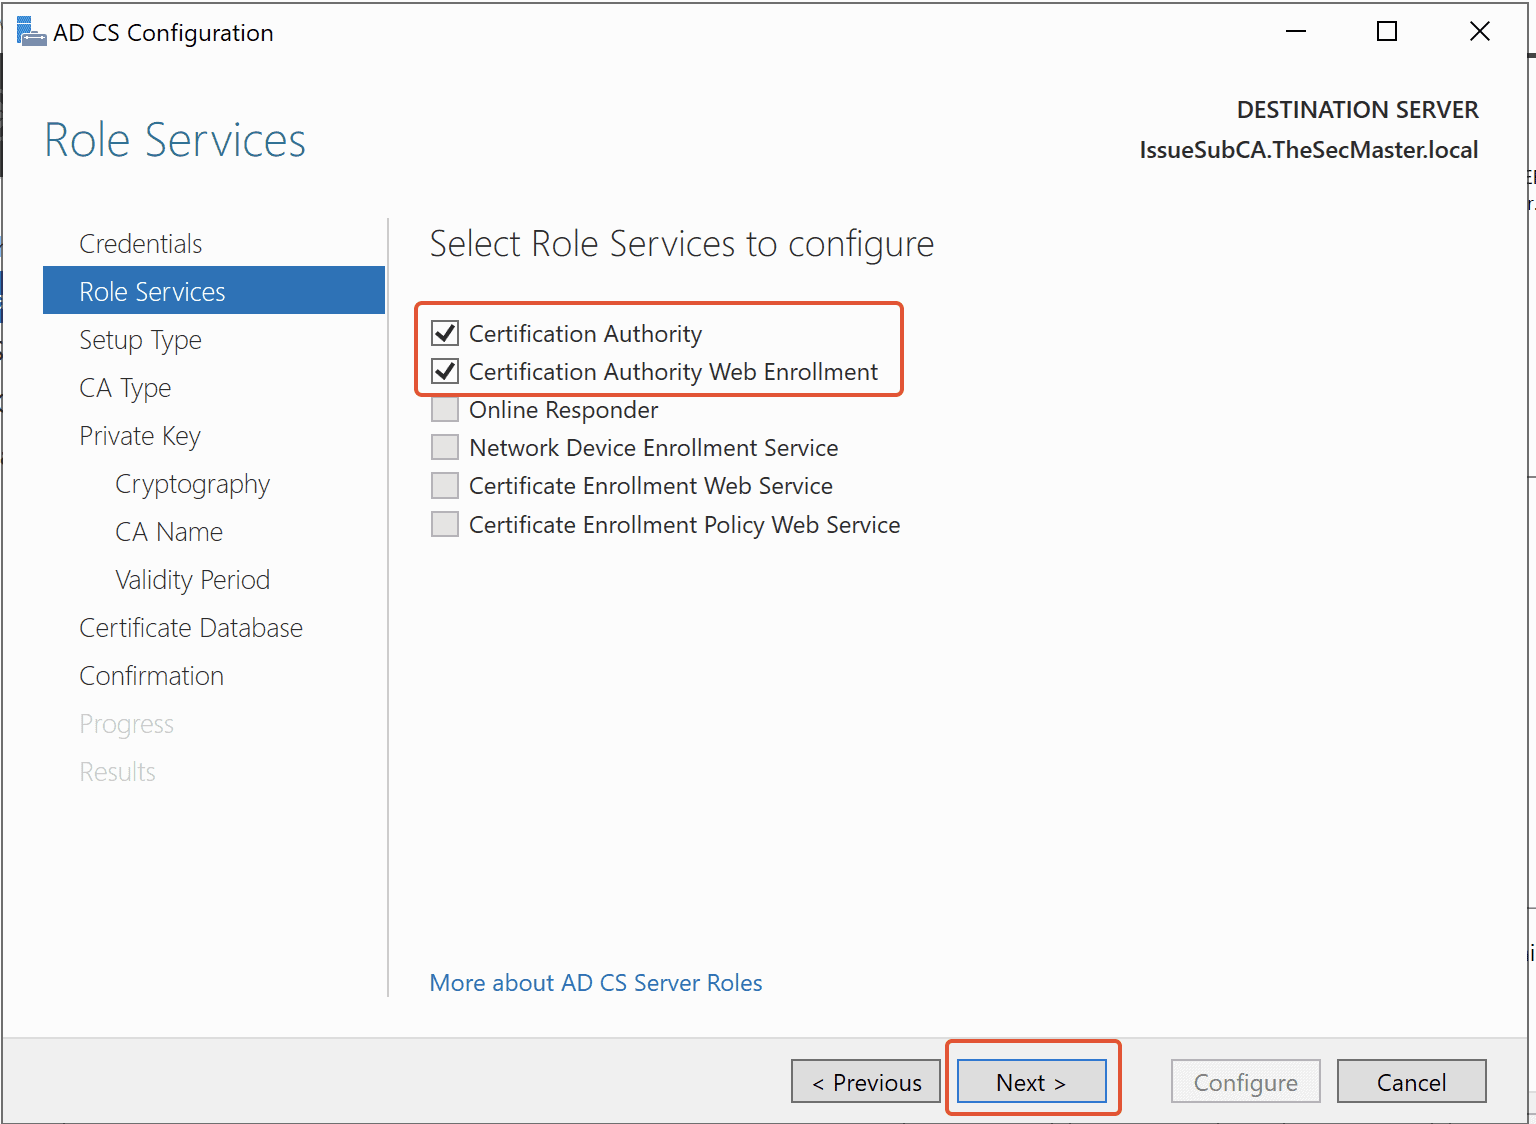
Step 9. Select ‘Certificate Authority’ and ‘Certification Authority Web Enrollment’ roles
You will be greeted with multiple options to choose from. Select the first and fourth options, ‘Certificate Authority’ and ‘Certification Authority Web Enrollment’ roles, then click Next.
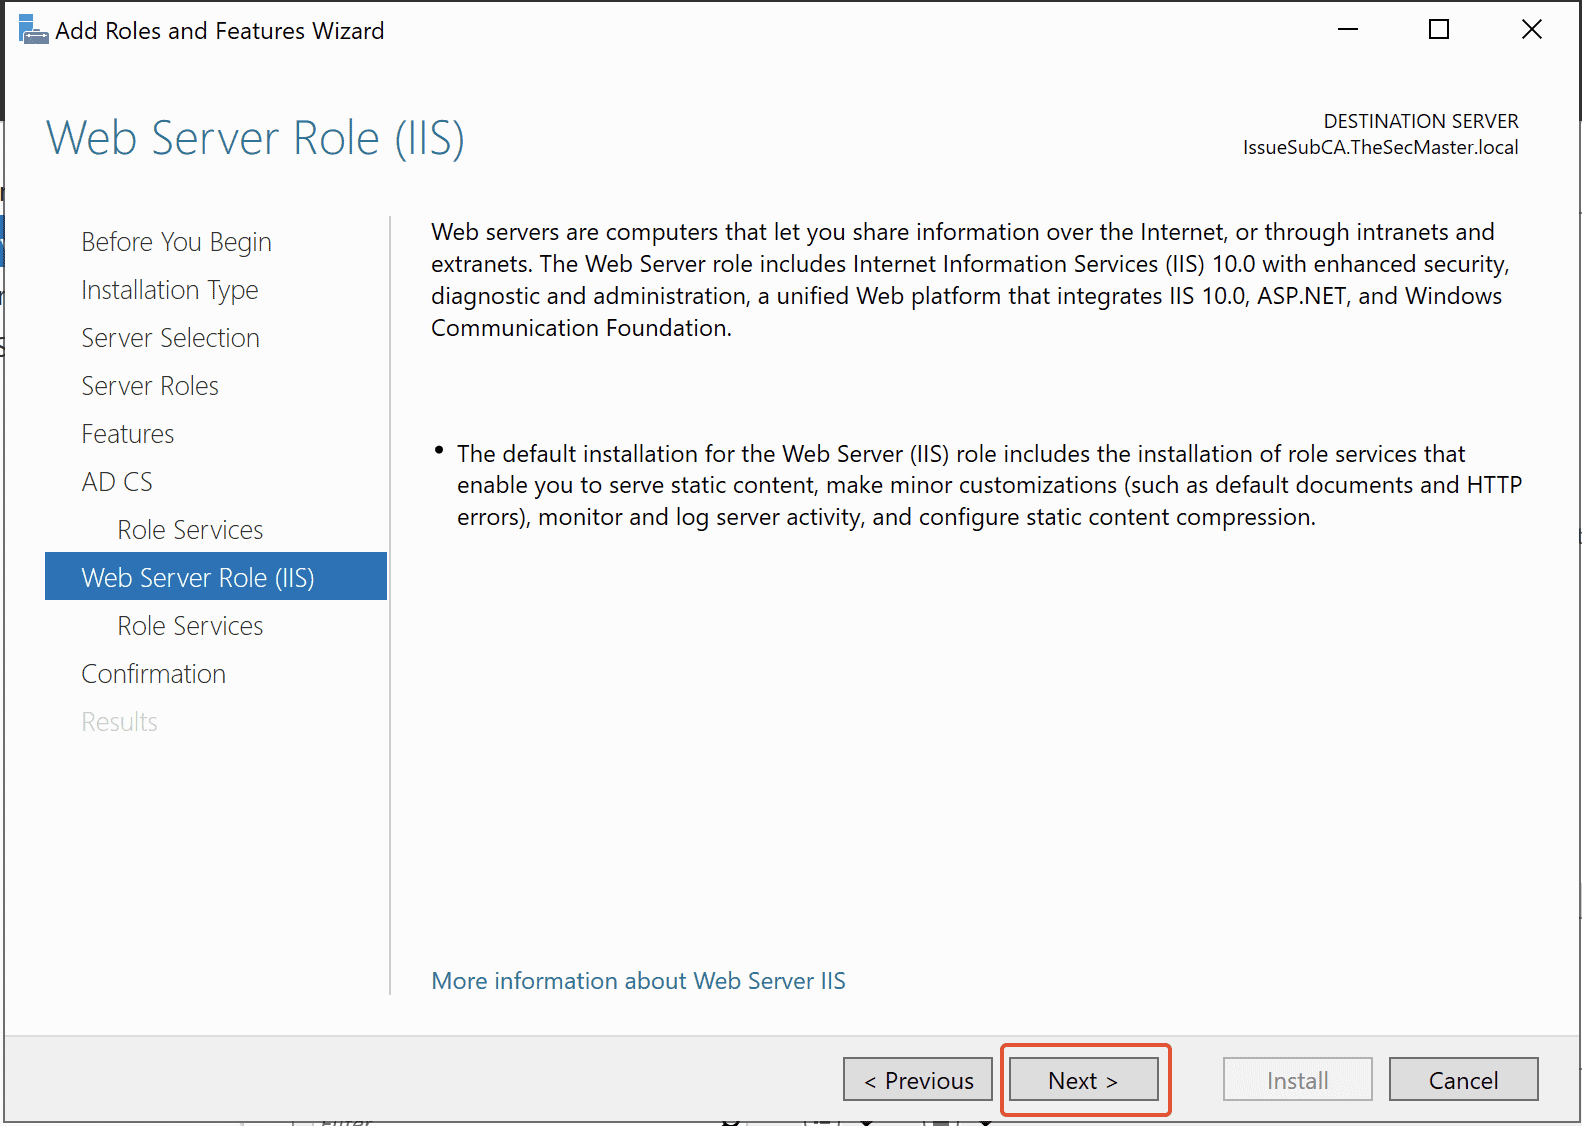
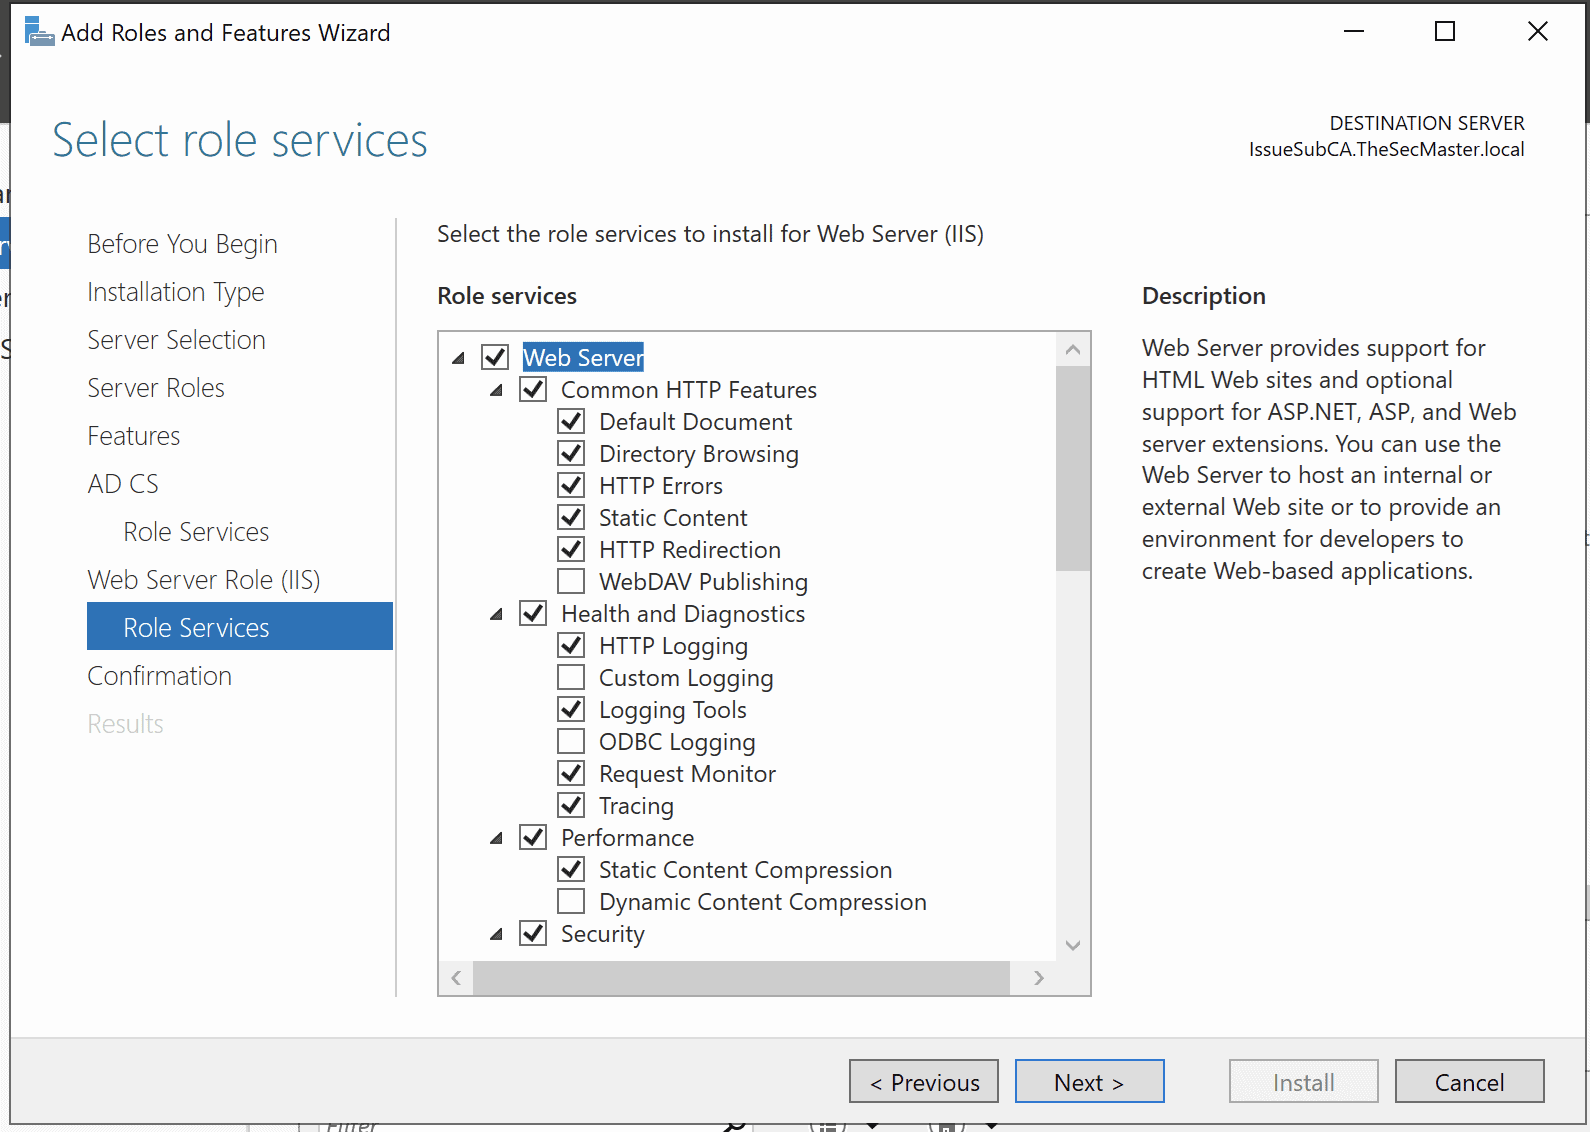
Step 10. Install Web Server Roll (IIS) with Default Role services
Since we are installing Web Server Roll (IIS) with Default Role services, click Next.
Step 11. Select Role Services
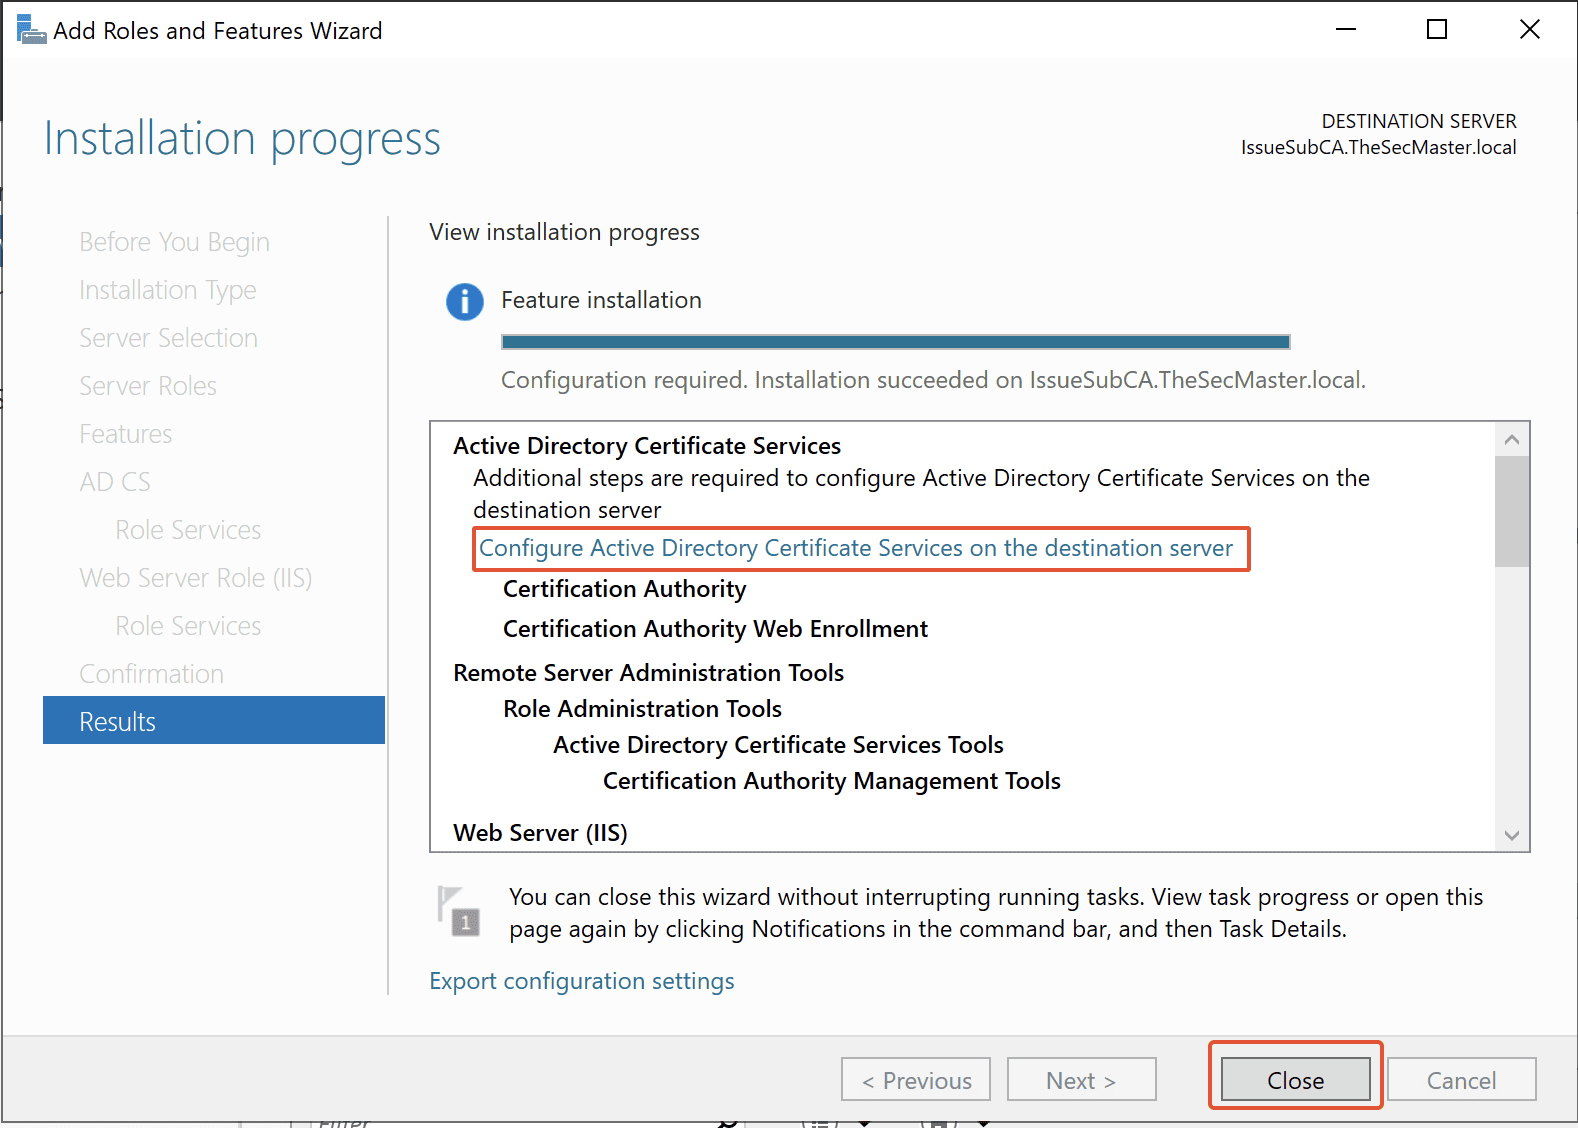
Step 12. Begin the installation of ‘Certificate Authority’ and ‘Certification Authority Web Enrollment’ roles

Step 13. Start the Active Directory Certificate Service configuration wizard
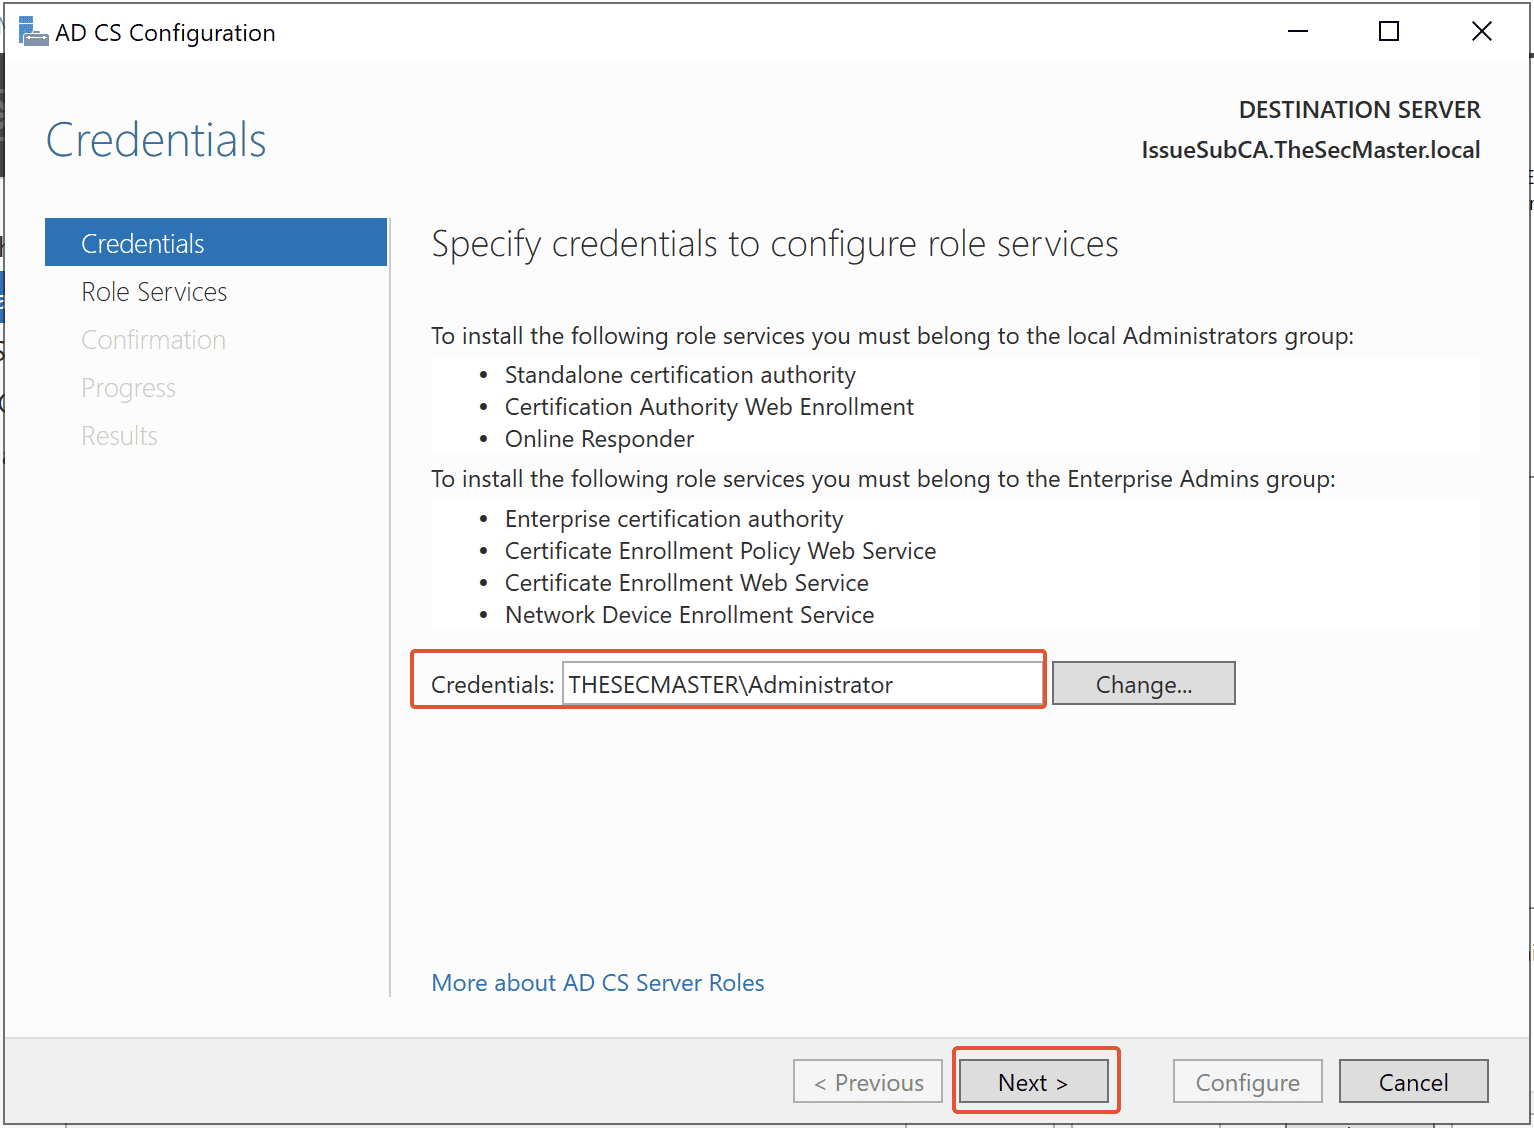
Step 14. Select the Administrator account in the ADCS configuration wizard
By default, Domain Account should be selected (Server is a Member of the Domain). Just ensure it is selected, then click Next.
Step 15. Select ‘Certificate Authority’ and ‘Certificate Authority Web Enrollment’ roles in the ADCS configuration wizard
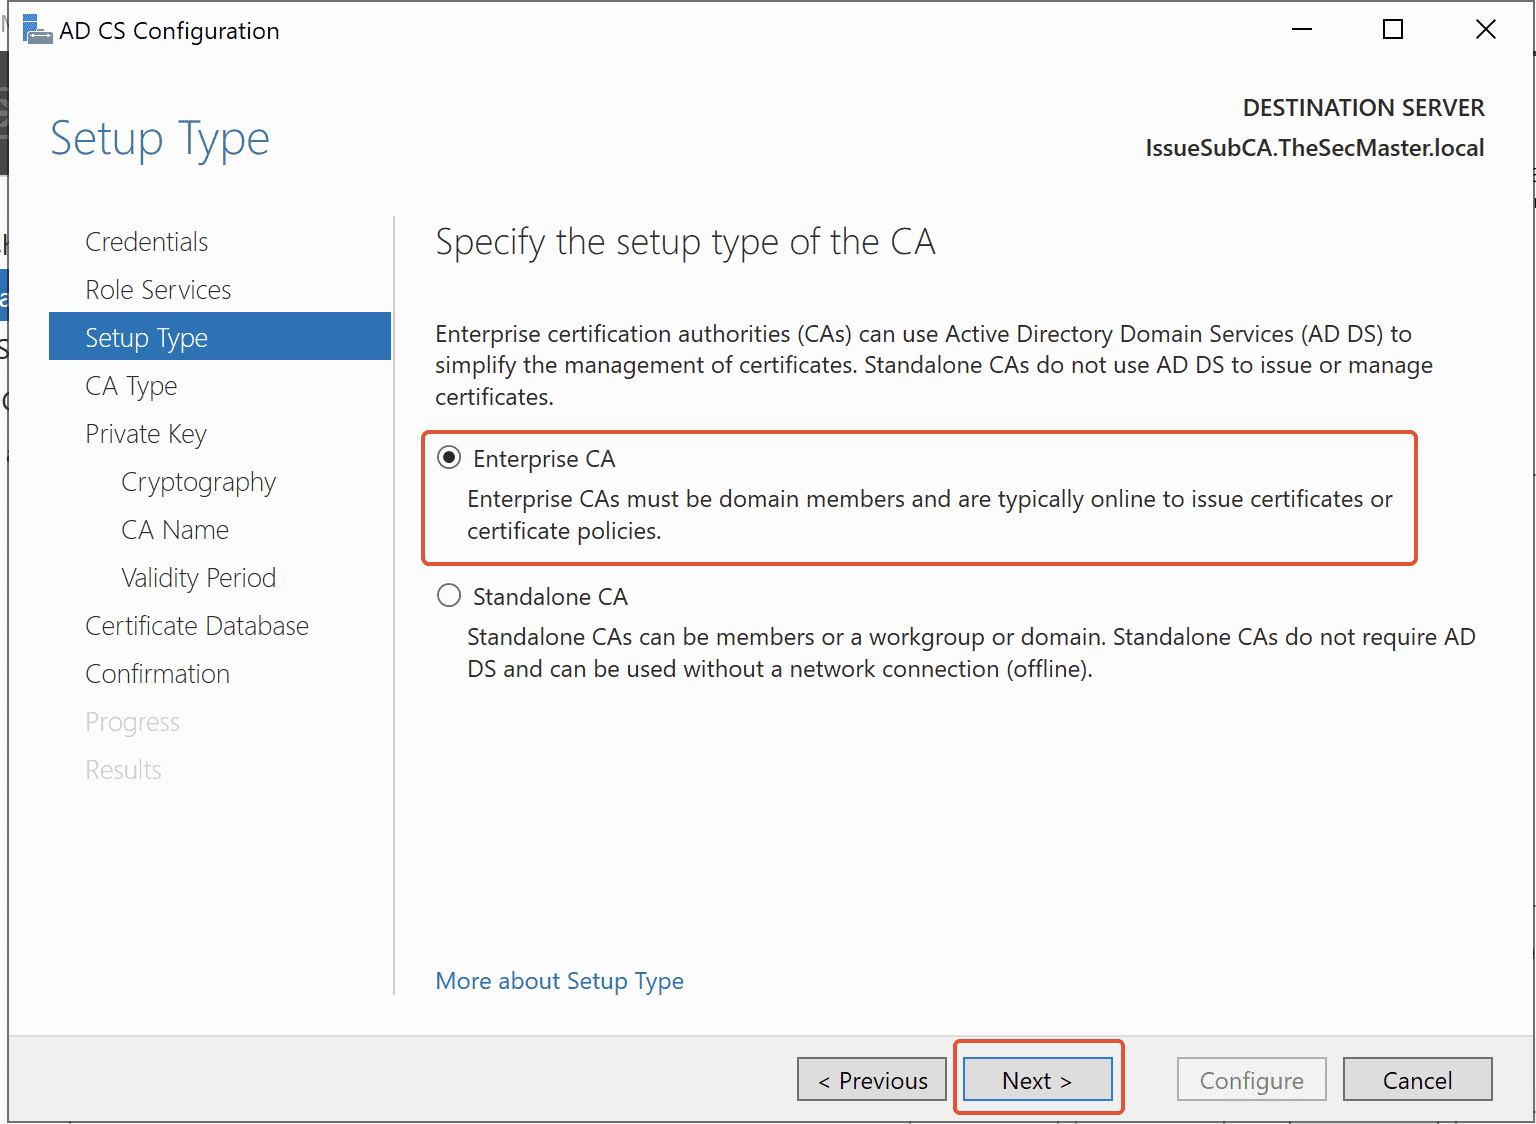
Step 16. Select the Enterprise CA in the ADCS configuration wizard
You will be greeted to choose two types of CA’s, Enterprise CA and Standalone CA. Since we are configuring Enterprise CA, Select the Enterprise CA option, then click on Next.
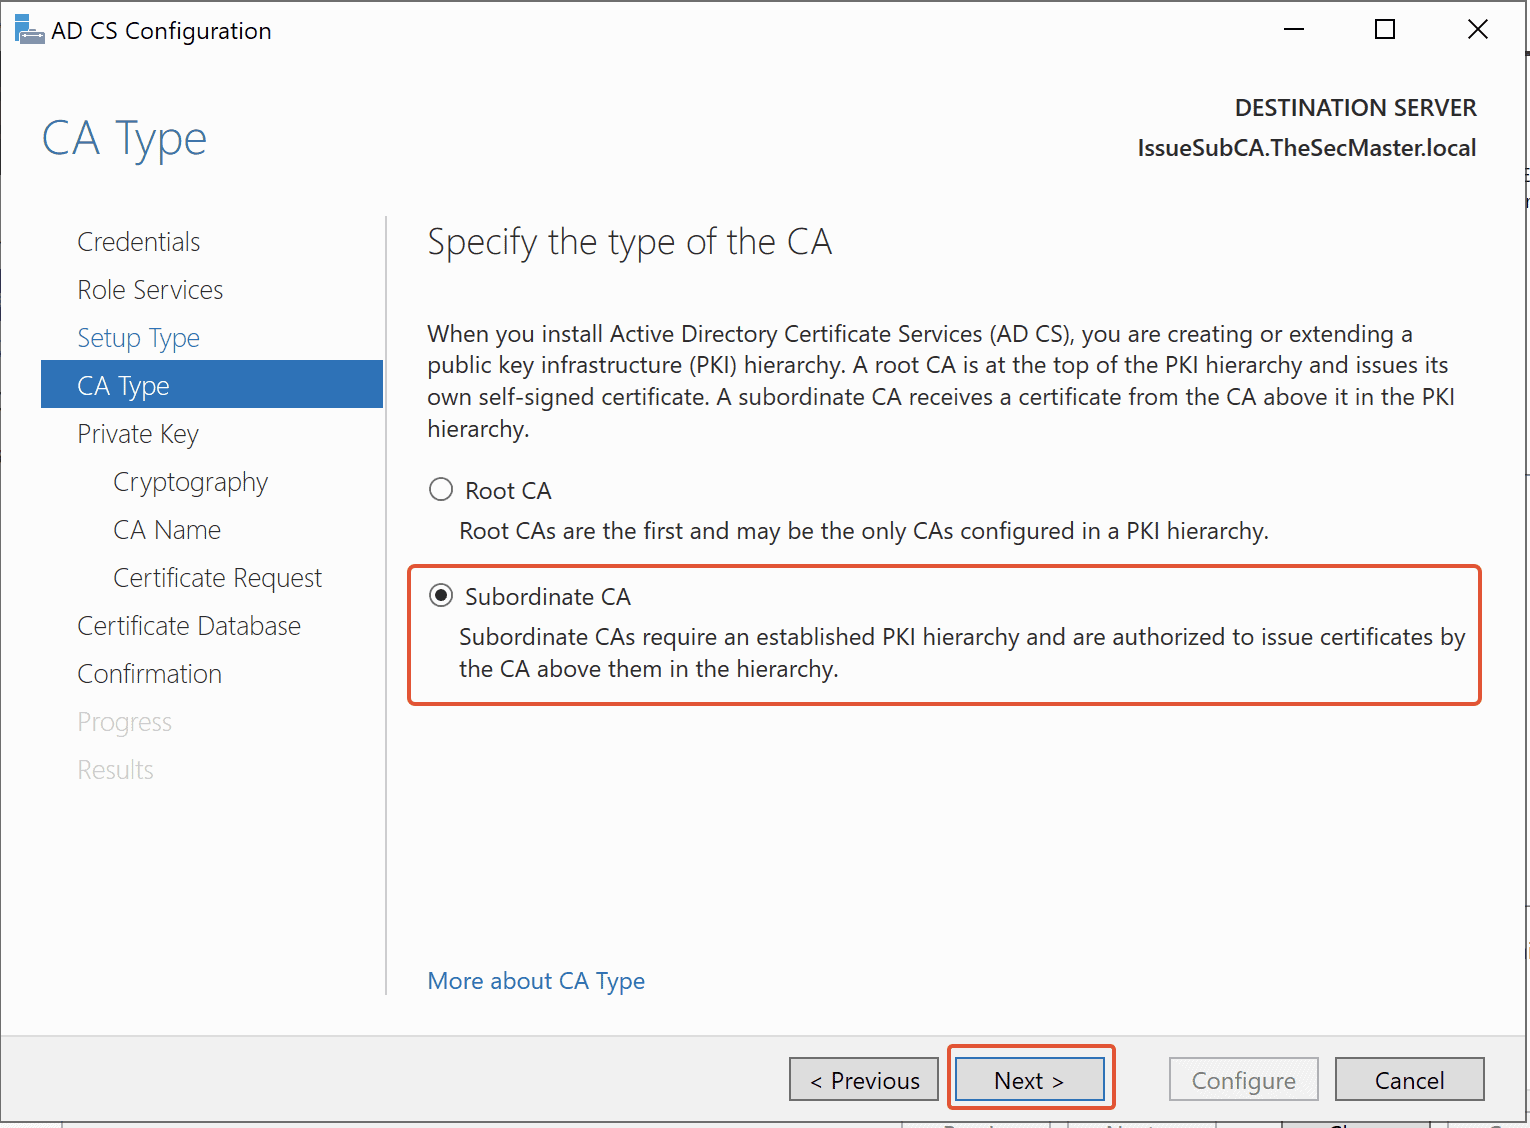
Step 17. Select Subordinate CA
Since we are going to set up Enterprise Issuing CA in this demo, go with the Subordinate CA option. Select Subordinate CA, then click Next.
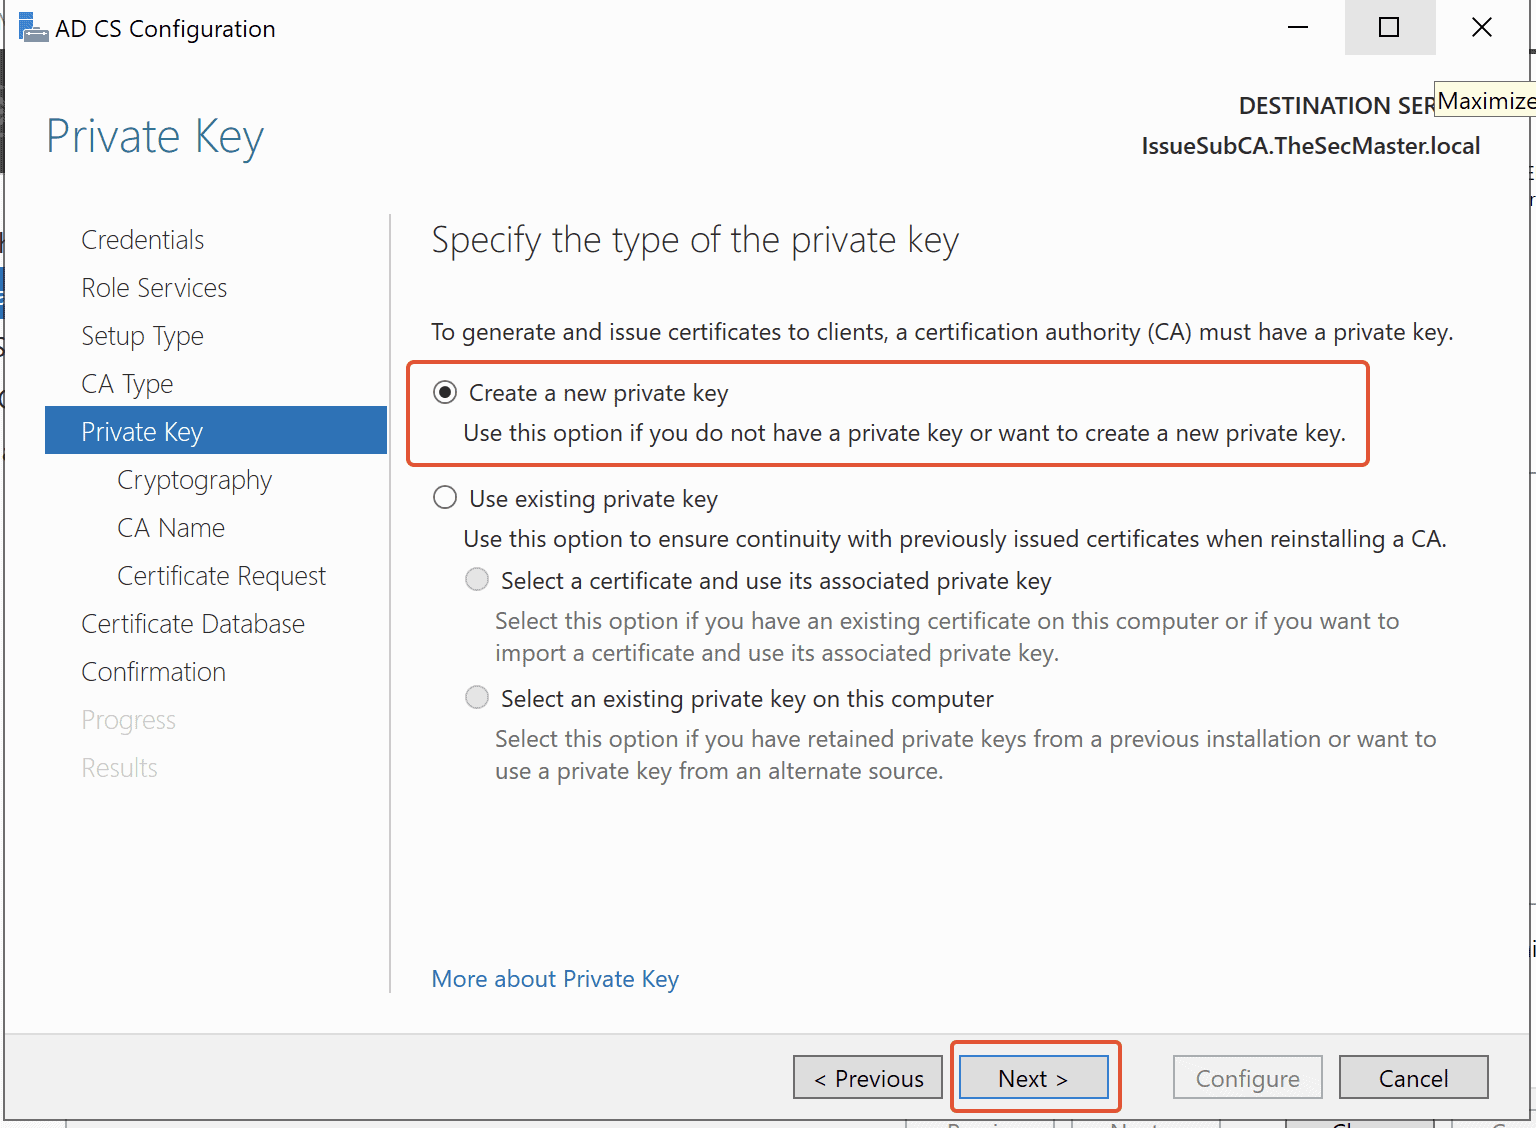
Step 18. Create a new private key for Enterprise Issuing CA
The private key is the first element of trust for any Certificate Authority. Let’s create a private key for this root CA. Since this is the newly created CA. Create a new private key. Select “Create a New Private Key,” then click Next.
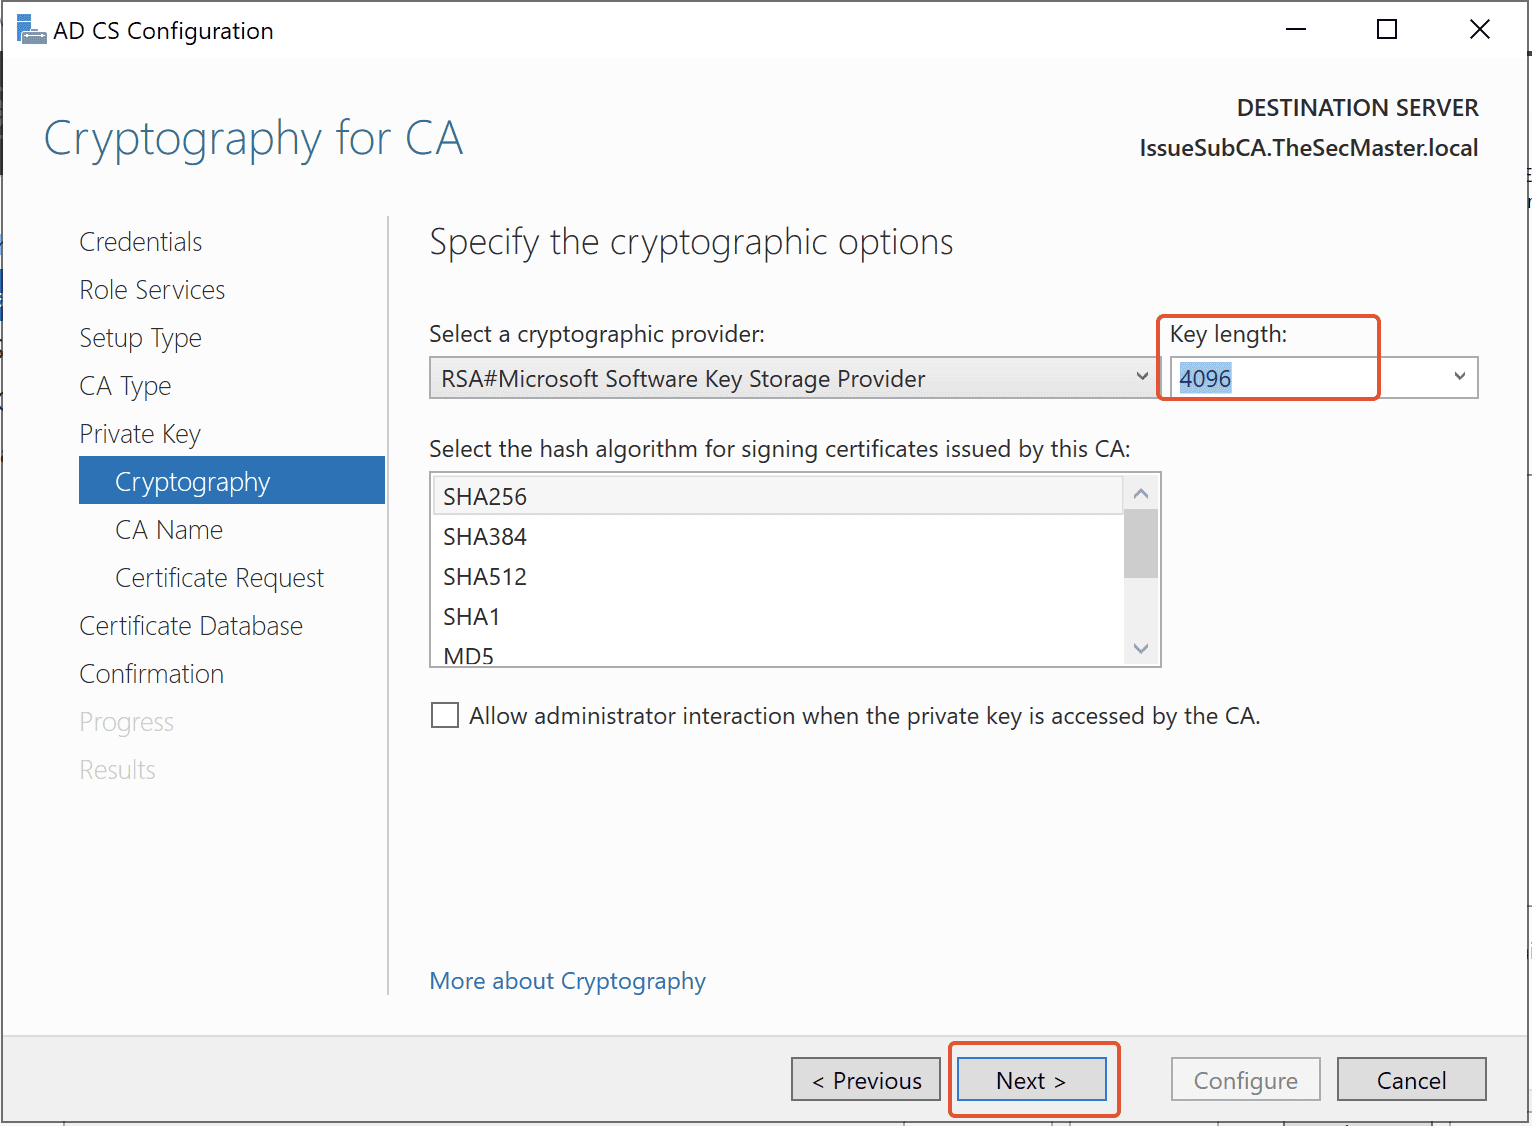
Step 19. Select Key Length & Hash Algorithm based on requirement
Select the Cryptographic Provider, Hash Algorithm and Key Length as per your design. Then Click Next.
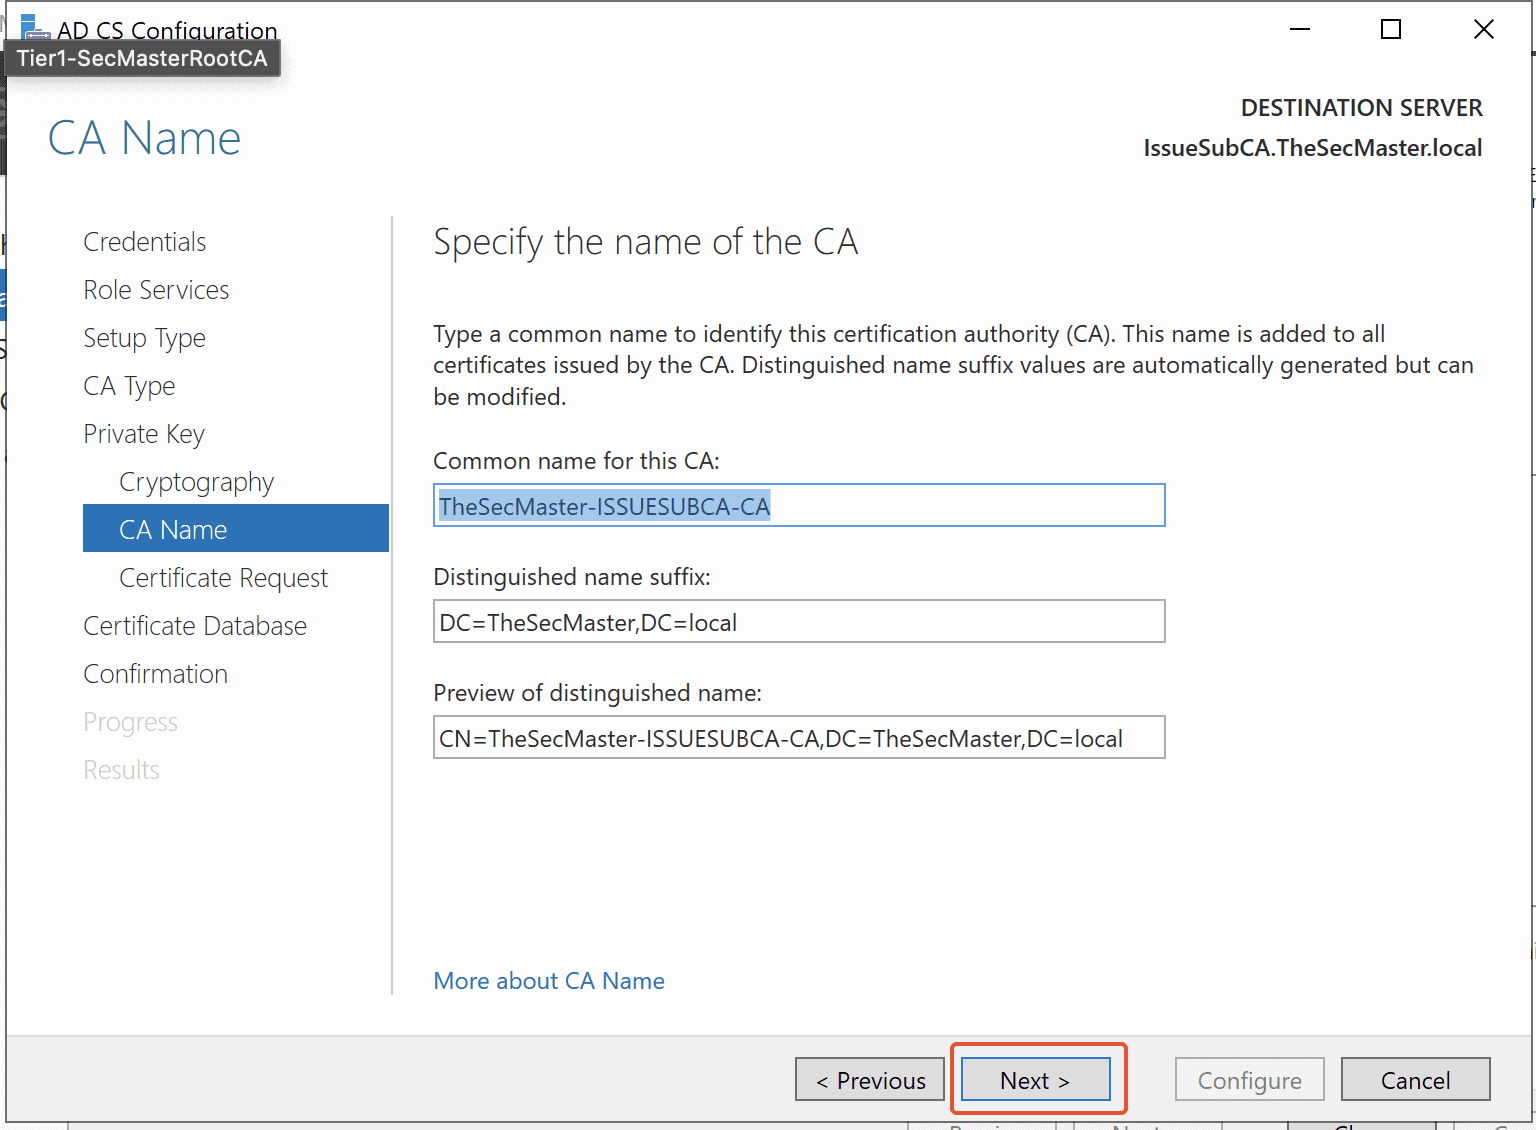
Step 20. Specify the name of the Certificate Authority
Specify the name of your CA. By default, Domain Name-Server Name with ‘– CA’ will be taken as the CA name. Click on ‘Next.’
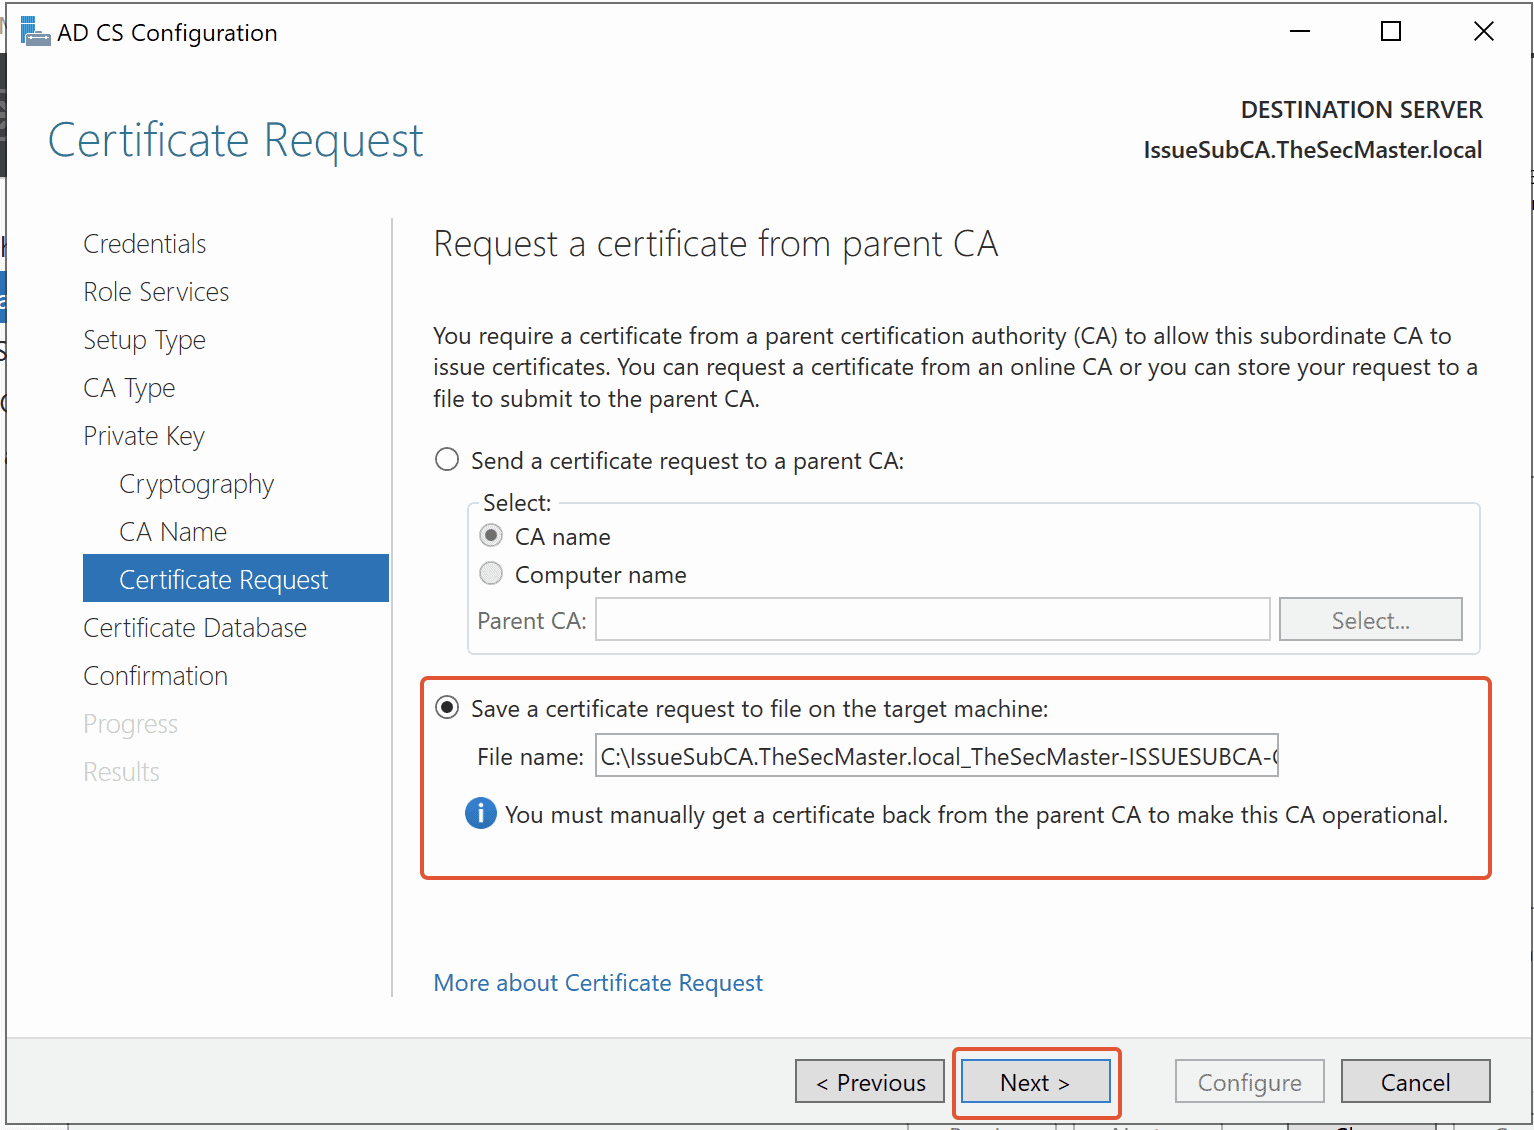
Step 21. Save a Certificate Request to a file that is requested from the parent CA
Since our Root CA is Standalone Root CA and the server is not connected to the network,
we need to Save a certificate request to a file. Click on ‘Next.’
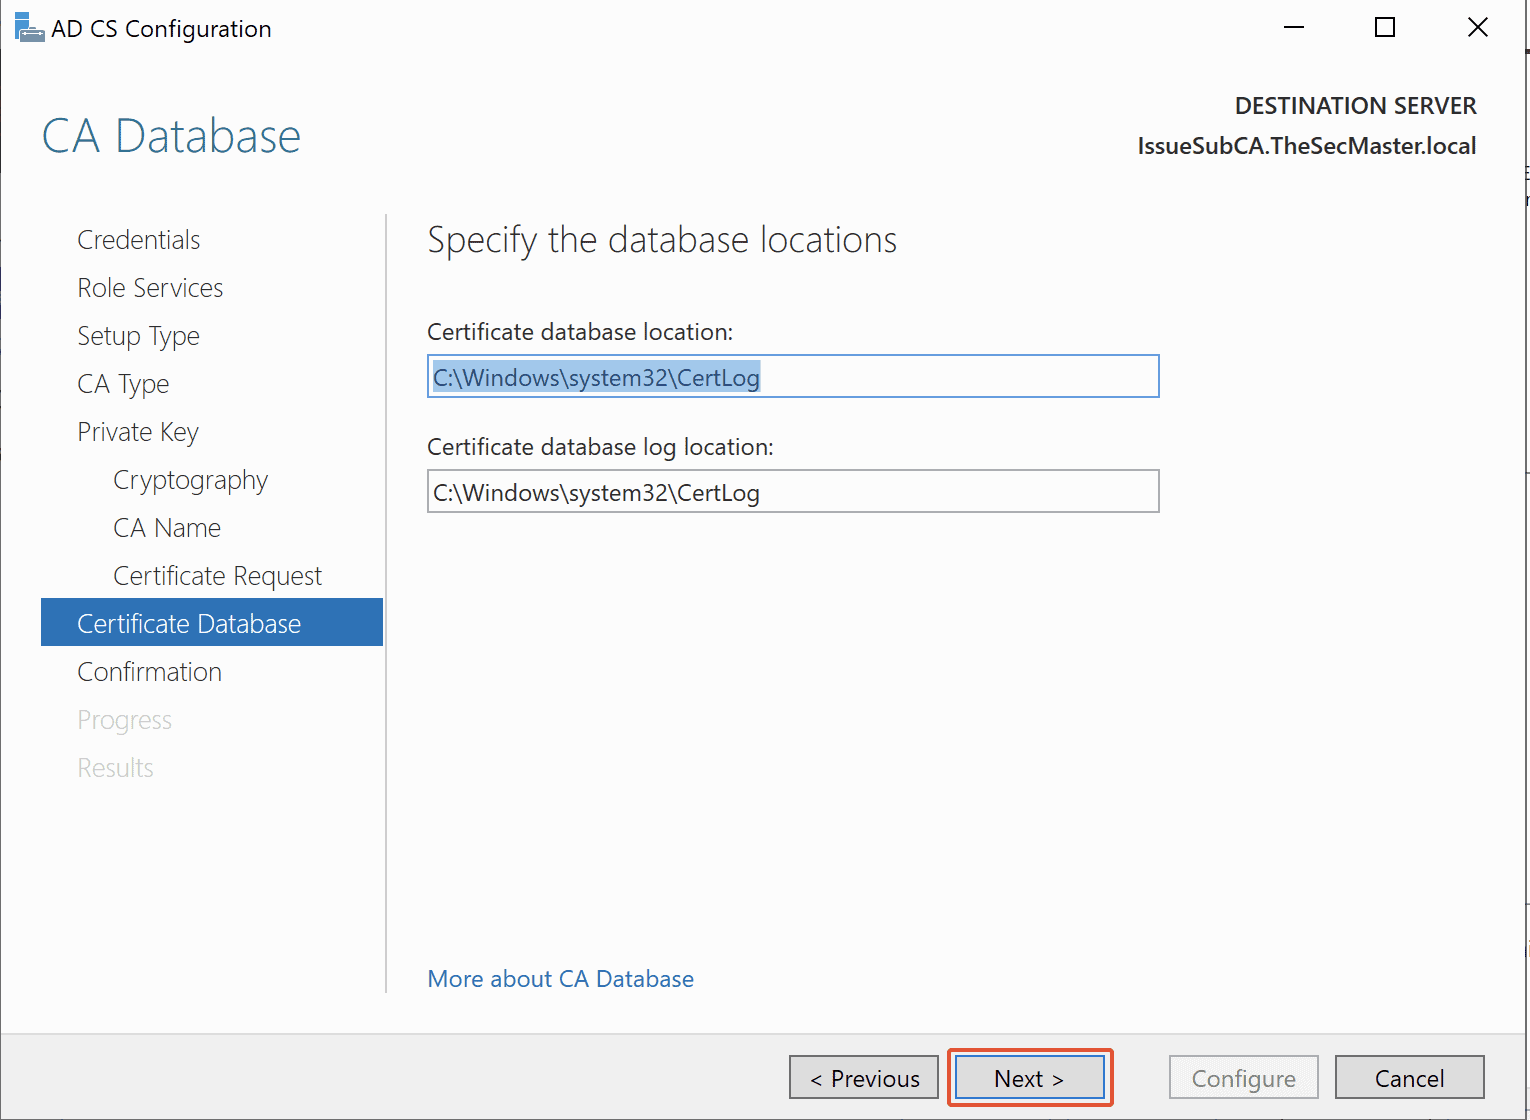
Step 22. Specify Database & Logs location for Enterprise Issuing CA
Specify the location for the database and logs for your Enterprise Issuing CA. You can leave this default as it is, then click Next.
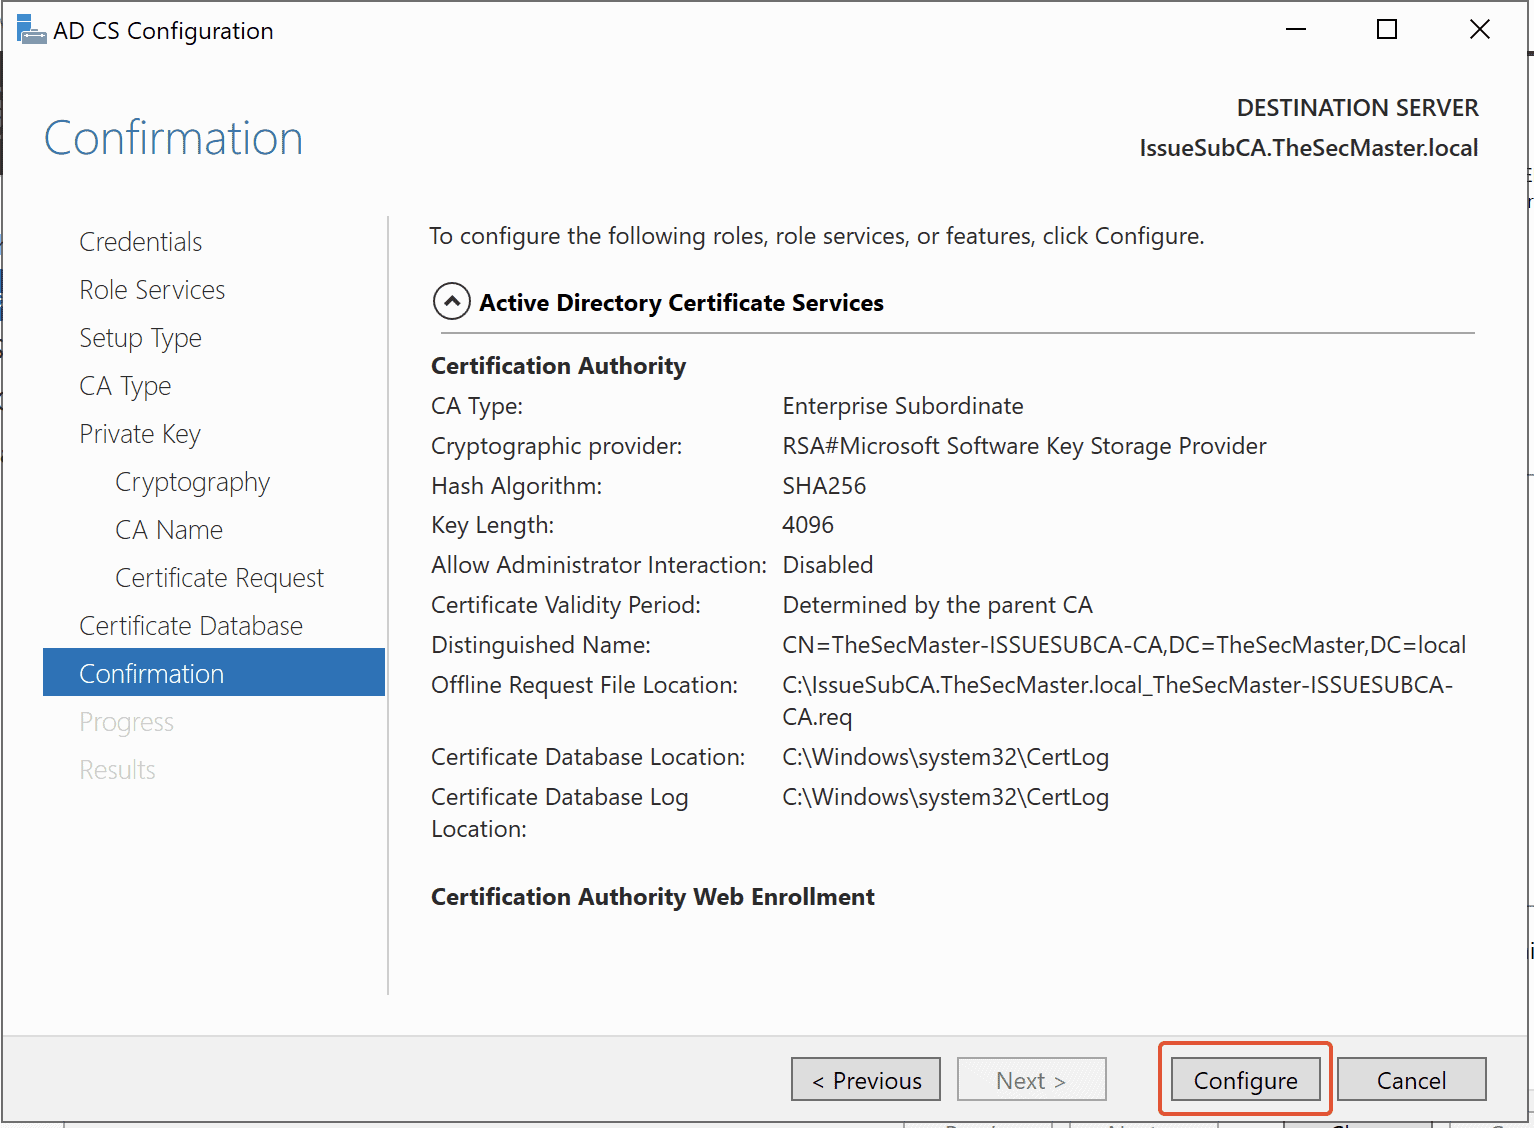
Step 23. Verify the summary of the configuration
Look at all the configurations, then click on Configure.
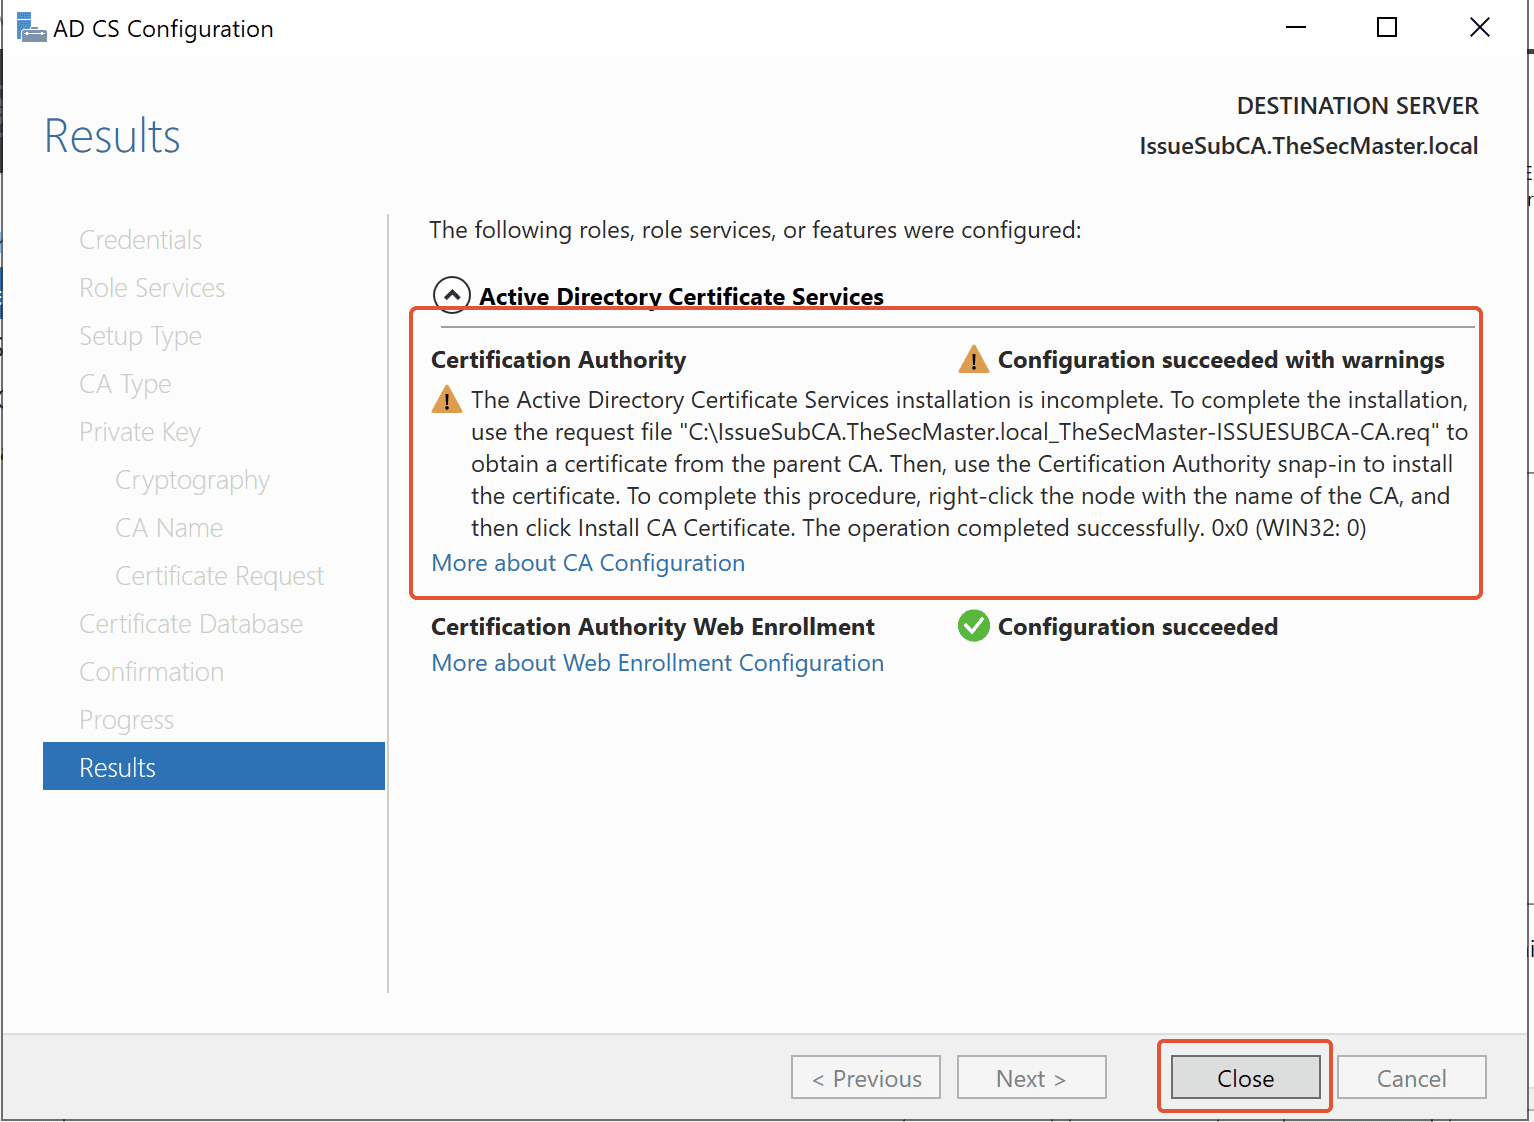
Step 24. Close the configuration wizard after the completion
Still, the ADCS installation is incomplete. Needs to submit this Request file in Root CA to get the certificate and install the certificate in this issuing CA server to complete the installation.
Click on the Close button upon the completion of the configuration wizard.
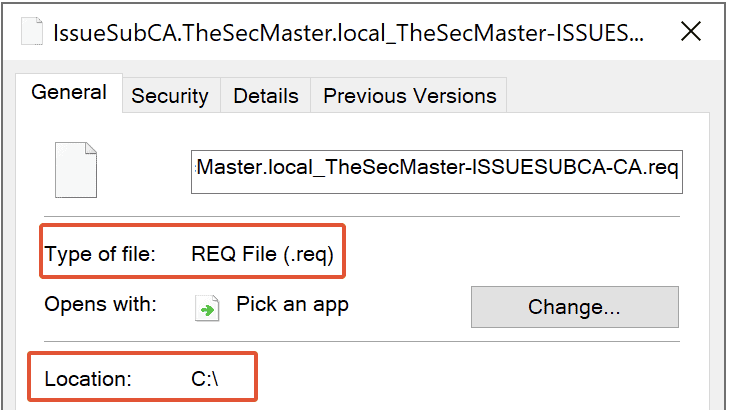
Step 25. Certificate Request file in C drive
Certificate Request file, which was saved in location ‘C:‘
Step 26. Submit the request and Issue certificate for Enterprise issuing CA
To submit the request on Standalone Root CA (SecMasterRootCA) and Issue certificate for Enterprise issuing CA (IssueSubCA.TheSecMaster.local).
1. log in to the Standalone Root CA (SecMasterRootCA) as Administrator.
2. Copy the Request file (which was generated in Issuing CA) into Standalone Root CA.(SecMasterRootCA) to generate a certificate.
In this demo, the Request file (IssueSubCA.TheSecMaster.local_TheSecMaster-ISSUESUBCA-CA.req) is copied into C:\ on the Root CA server.
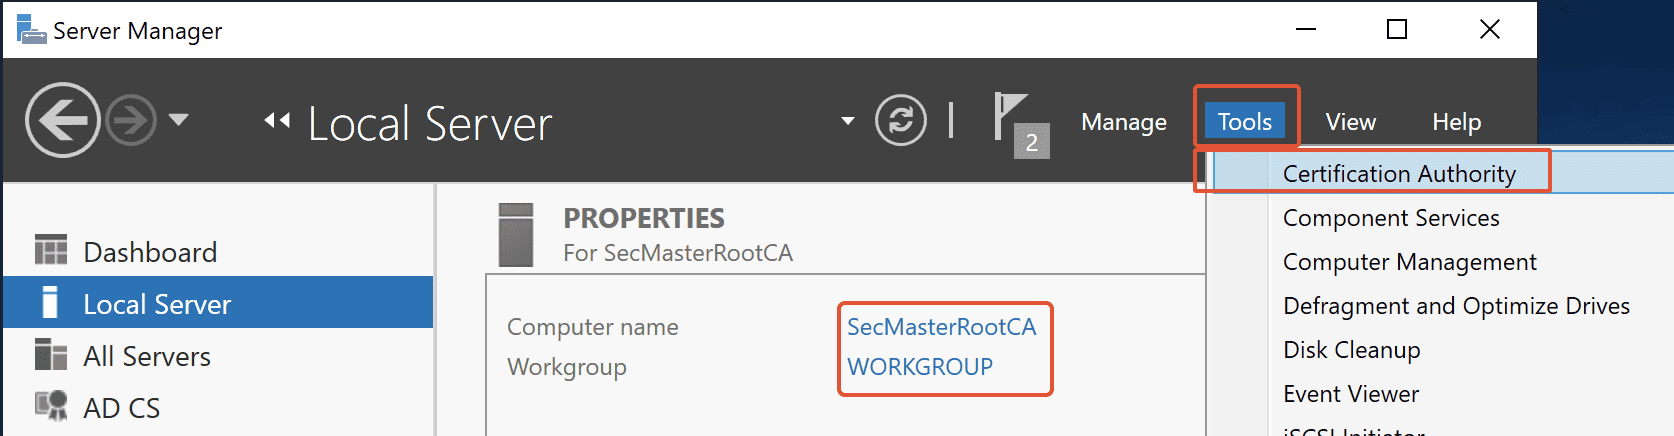
3. Open Certification Authority console
On the Root CA server, open Server Manager –> Click on ‘Tools‘ –> click on ‘Certification Authority‘.
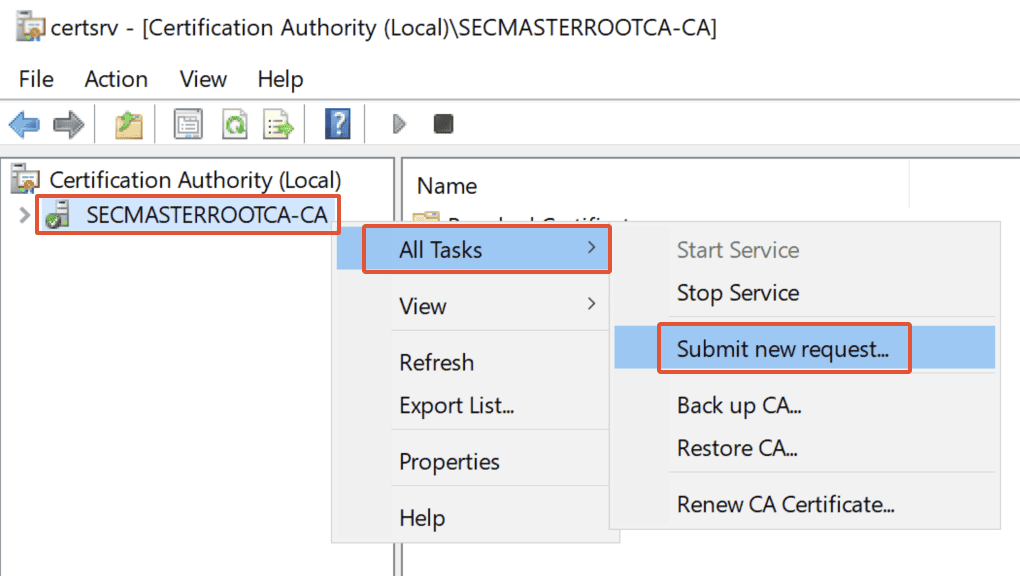
Step 27. Submit New Request
On Certification Authority Console, right-click on Root CA Common Name (SECMASTERROOTCA-CA) –> All Tasks –> Submit a new request.
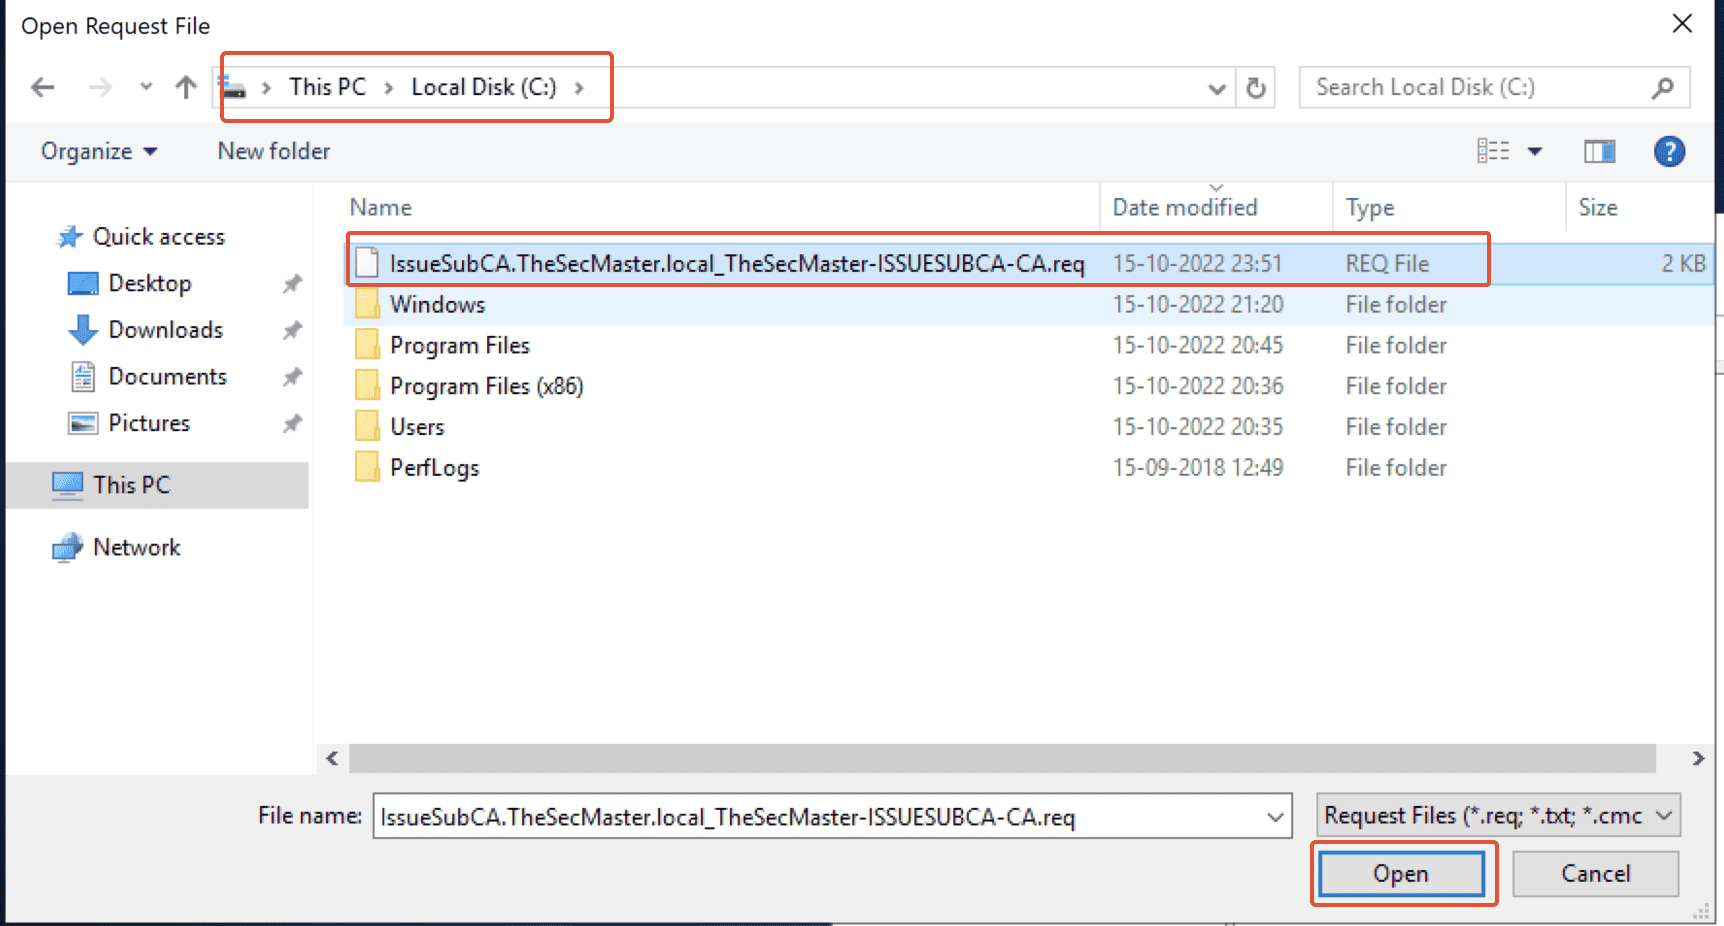
Step 28. Select the Certificate Request file
Select the requested file which was copied in the location C:\ and click on ‘Open.’
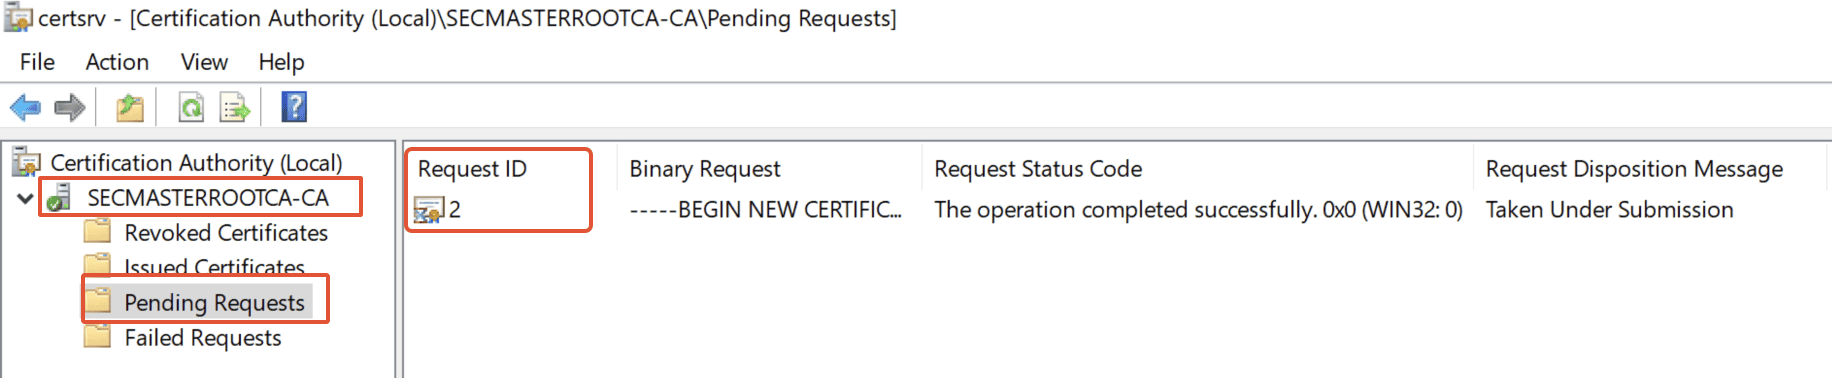
Step 29. Certificate requests in the pending queue
After submitting the requested file, we have the request under ‘Pending Requests.’
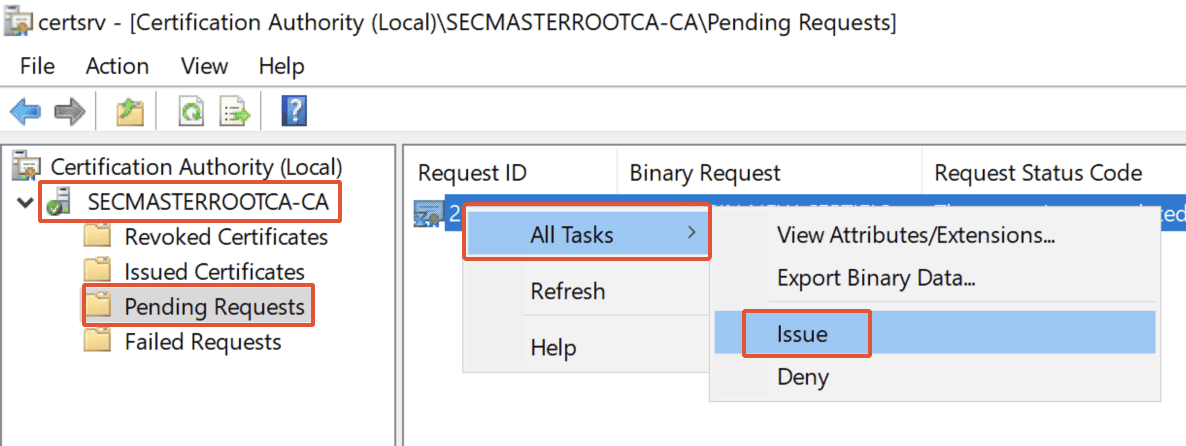
Step 30. Issue the certificate
Under ‘Pending Requests’, we have the requested file, Right-click on the file –> click on ‘All Tasks’ –> Click on ‘Issue.’
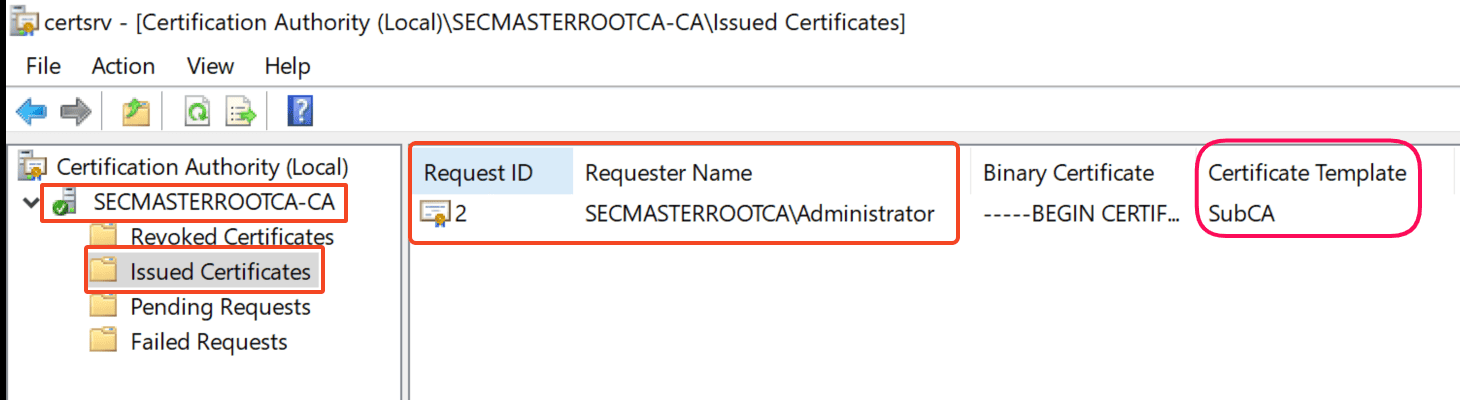
Step 31. Certificate is issued
We see the issued certificate under the ‘Issued Certificates’ folder. Make sure Certificate Template is ‘SubCA.’
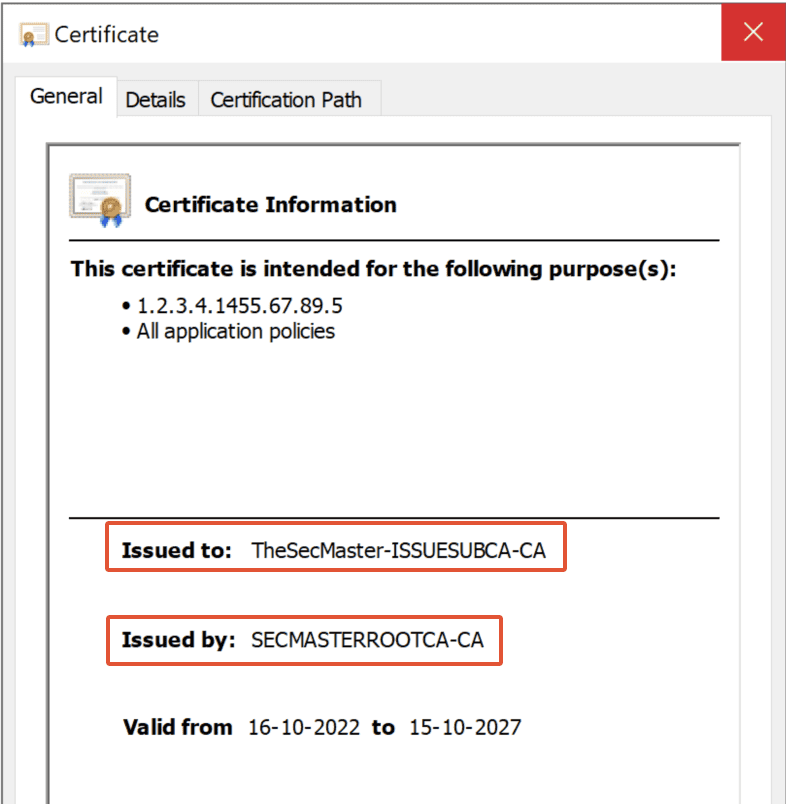
Step 32. Verify the certificate
Double-click on the certificate and verify the ‘Issued to’ and ‘Issued by’ details in the ‘General’ tab.
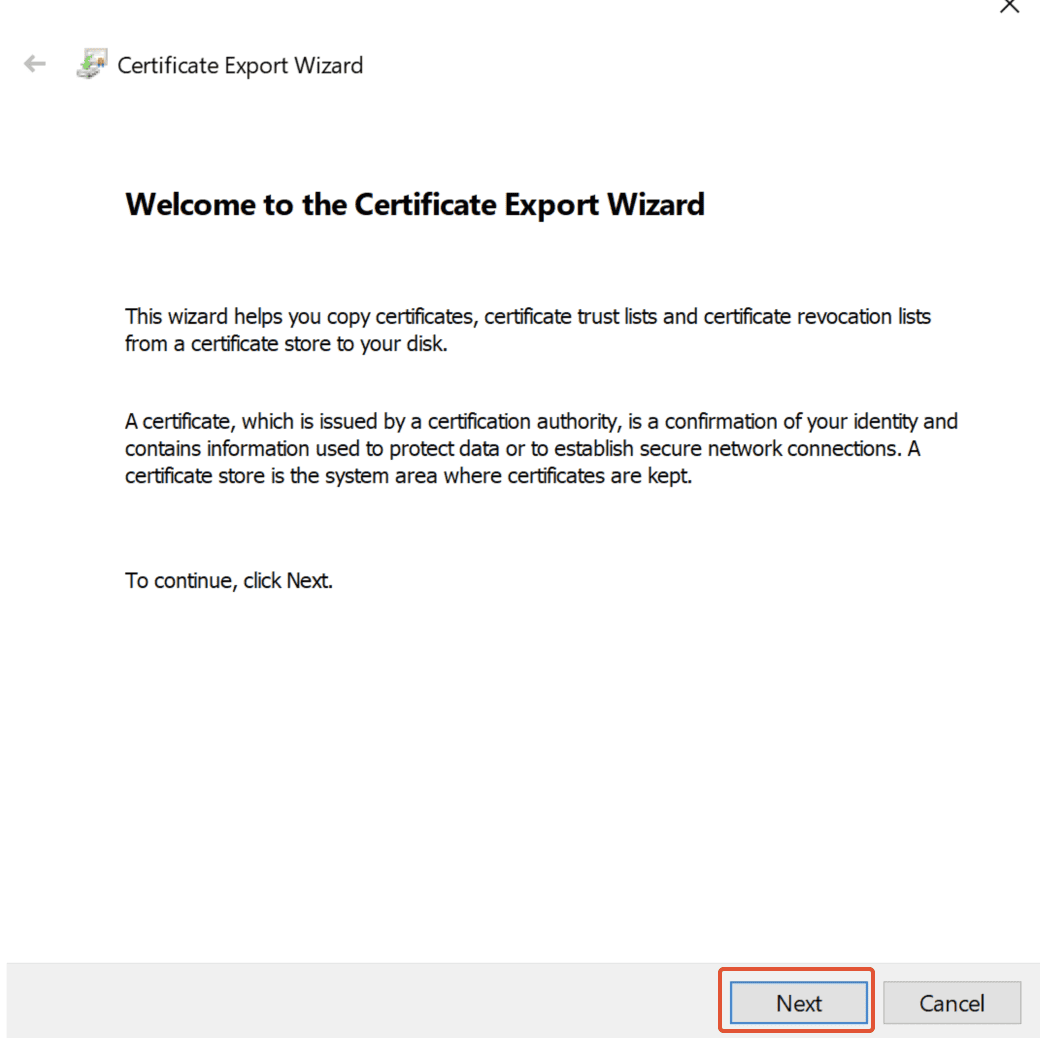
Step 33. Export the certificate to a file
Click on the ‘Details’ tab and ‘Copy to file’ to initiate the certificate export. Click on ‘Next’ in the Certificate Export Wizard.

Step 34. Certificate Export Wizard
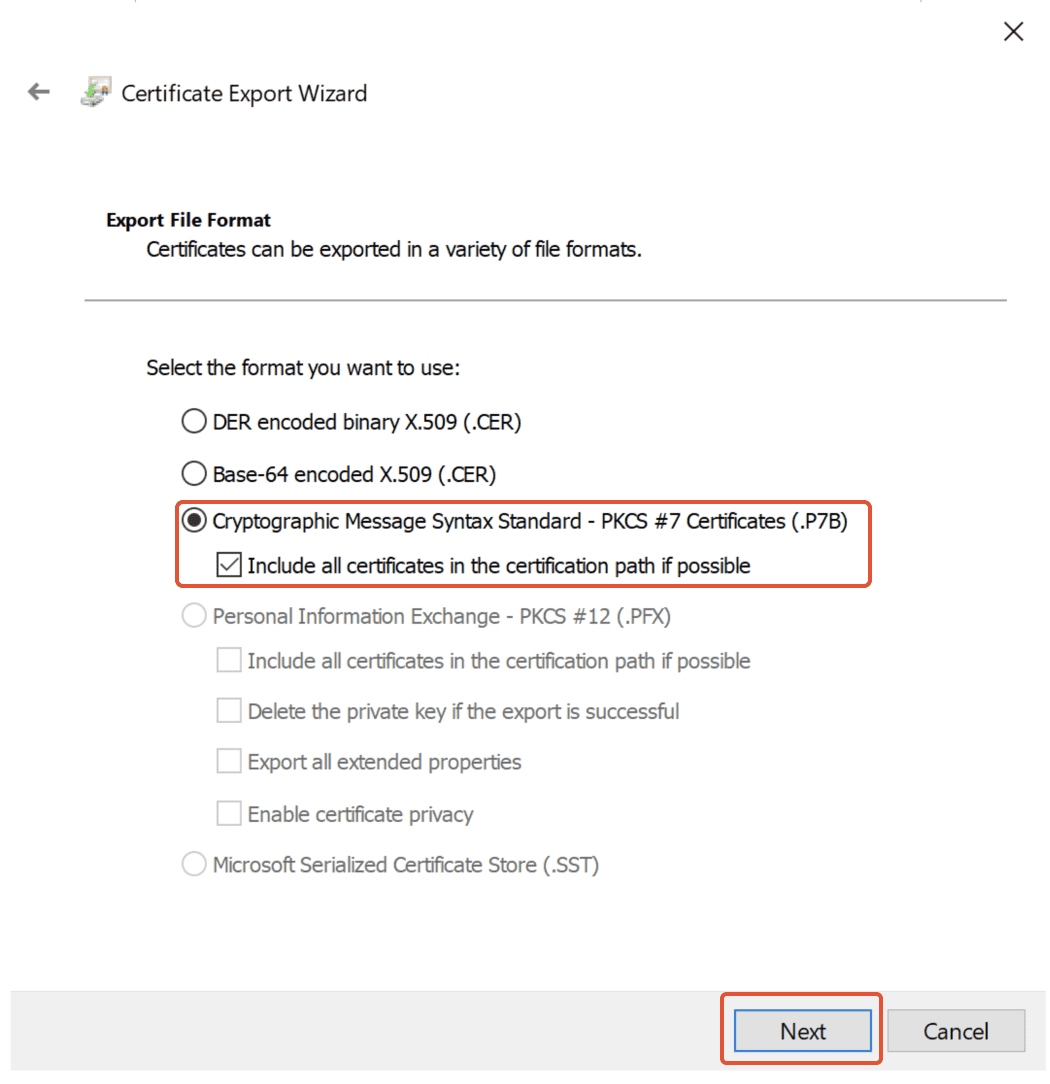
Step 35. Choose the Export File Format
In the ‘Export File Format’, select ‘Cryptographic Message Syntax Standard – PKCS #7 certificate (P7B)’ and also ‘Include all certificates in the certification
path if possible’ and click on ‘Next.’
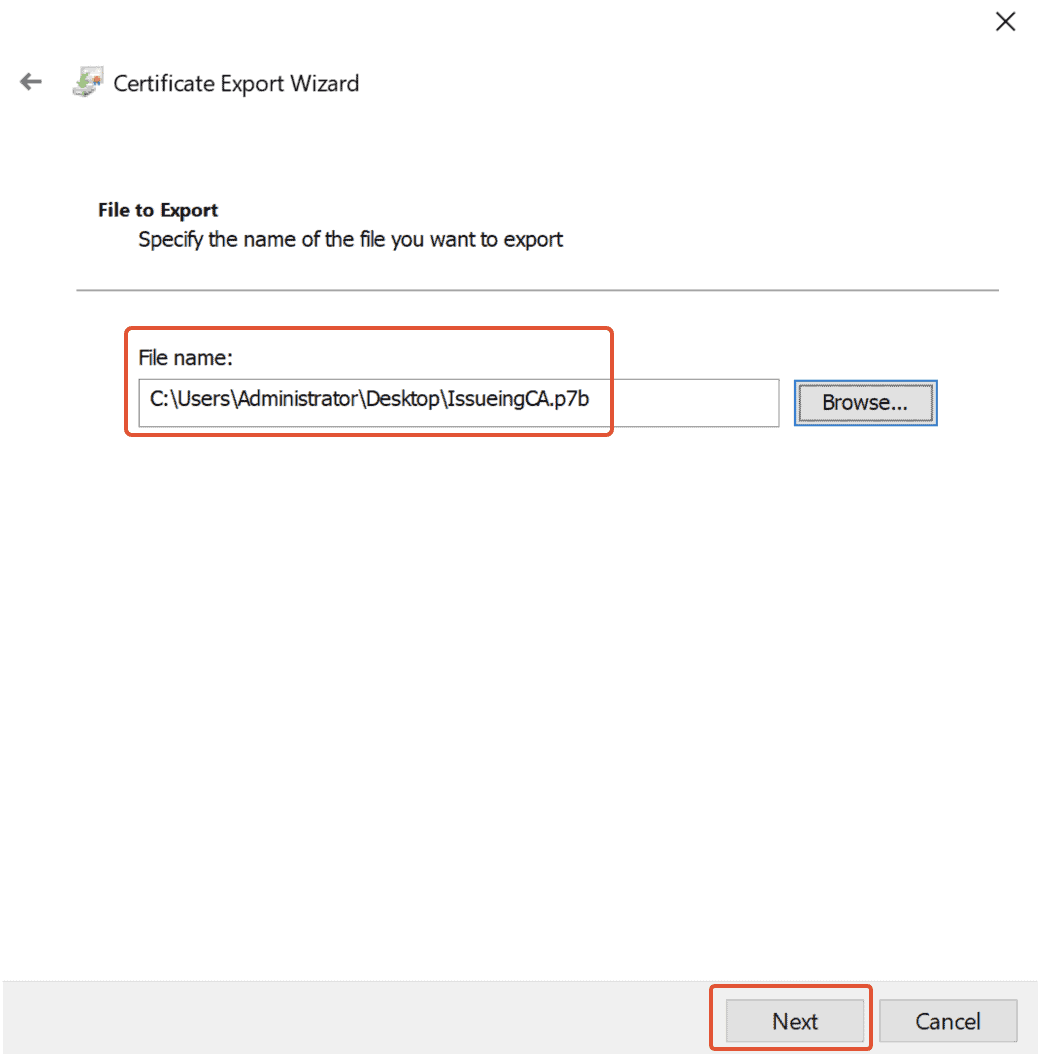
Step 36. Browse the location where certificate to be exported
Location selected as ‘Desktop’ and click on ‘Next.’
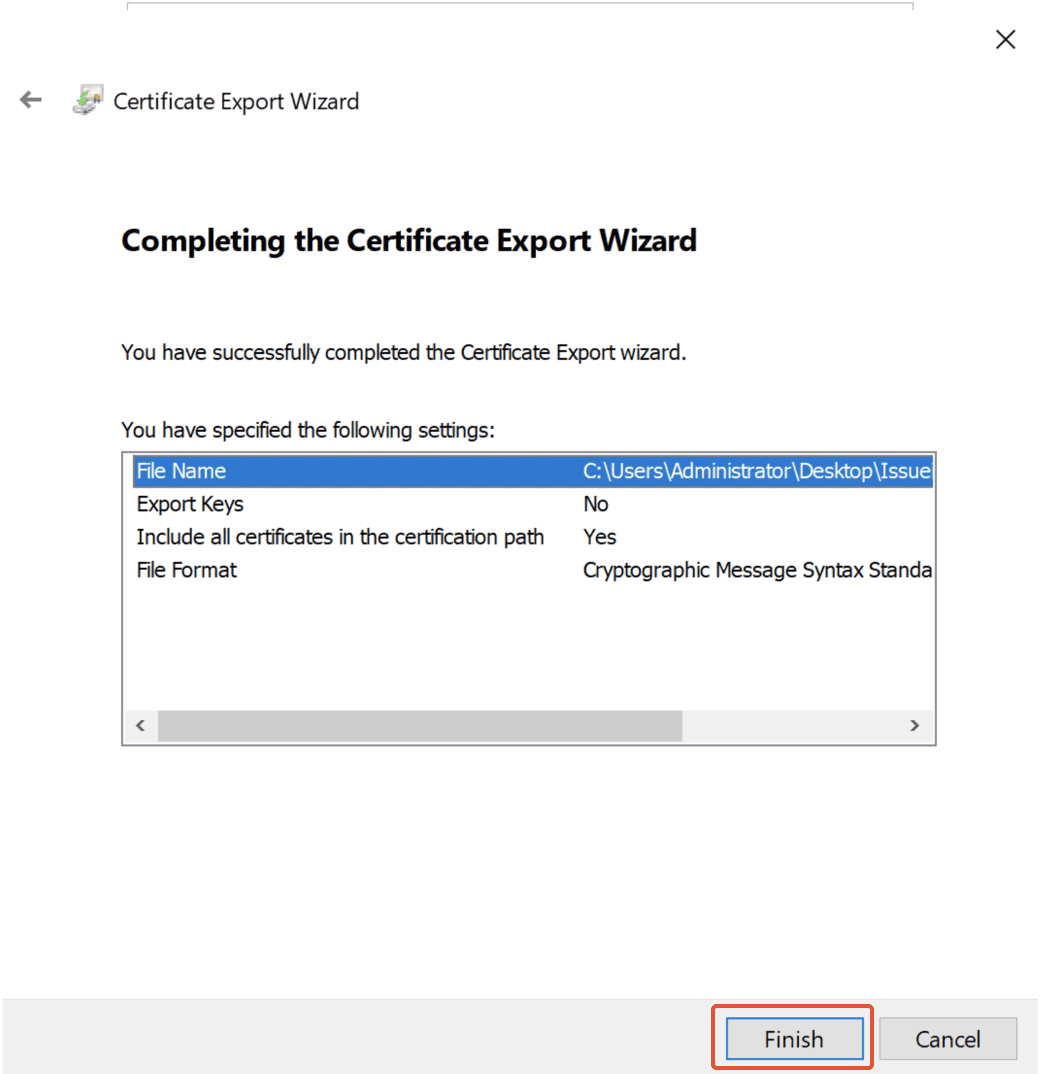
Step 37. The final step to Export
Click on ‘Finish‘ in the Final step in the ‘Certificate Export Wizard.’
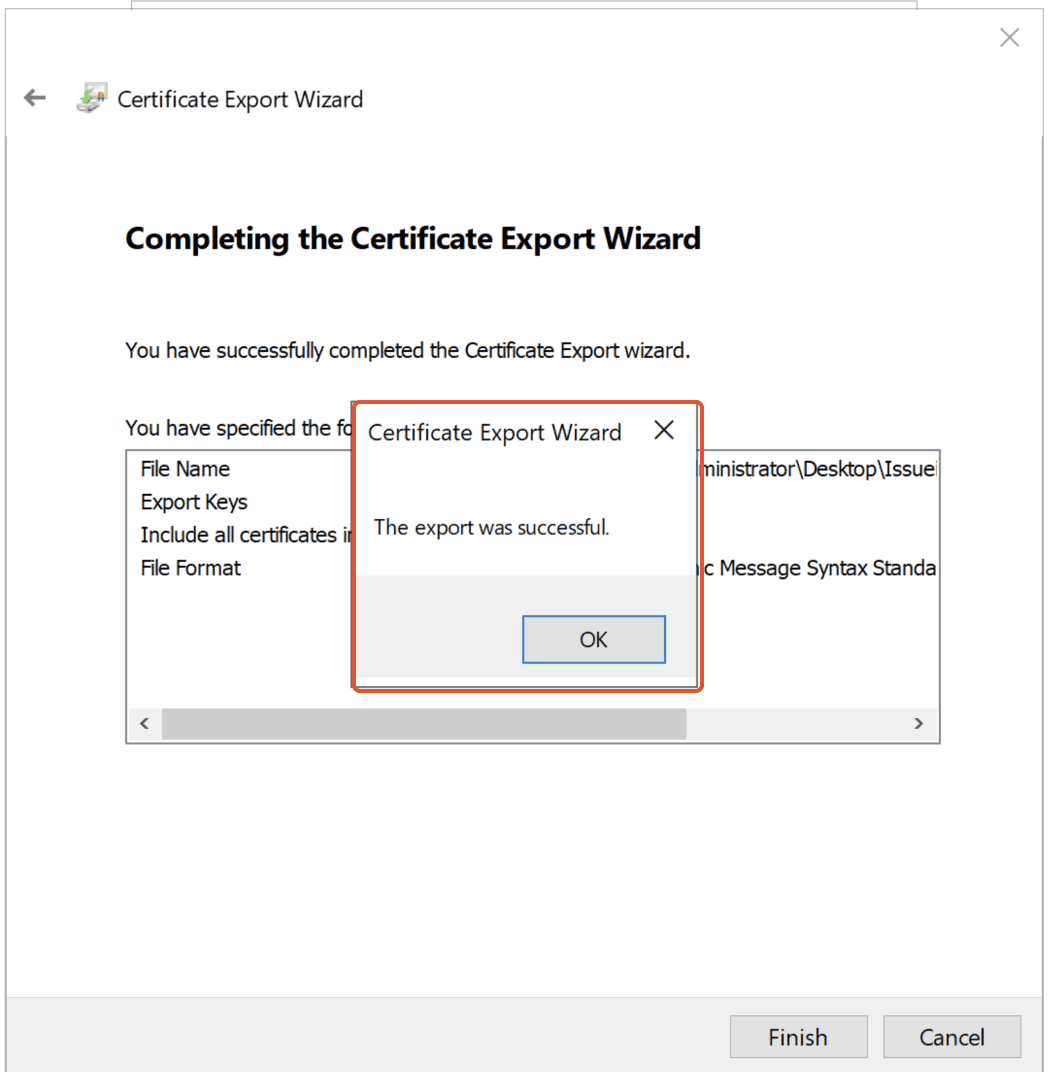
Step 38. Successful Export
Certificate Export completes with a message ‘The Export was successful’. Click ‘OK’ to complete the wizard.
Step 39. Install the Issued certificate on Issuing CA server
To Install the certificate on Enterprise issuing CA (IssueSubCA.TheSecMaster.local)
1. Log in to the Enterprise Issuing CA (IssueSubCA.TheSecMaster.local) server as TheSecMaster\Administrator
2. Copy the Certificate file (which was generated on Root CA) into Enterprise issuing CA (IssueSubCA.TheSecMaster.local) server.
In this demo, the Certificate file (IssueingCA.p7b) copied into C:\ on Enterprise issuing CA (IssueSubCA.TheSecMaster.local)
3. Open Certification Authority console
On Issuing CA server, open Server Manager –> Click on ‘Tools‘ –> click on ‘Certification Authority.’

Step 40. Install CA Certificate
In the Certification Authority Console, Services is stopped. Since certificate installation is not yet completed.
Right-click on the Common Name (TheSecMaster-ISSUESUBCA-CA) –> click on ‘All Tasks‘ –> Select ‘Install CA certificate.’

Step 41. Select the certificate file
Select the certificate file which was copied in the location C:\ and click on ‘Open.’

Step 42. Start the Certificate Authority Service
If the service didn’t start automatically, Right-click on the Common Name (TheSecMaster-ISSUESUBCA-CA) –> click on ‘All Tasks’ –> Select ‘Start Service.’
Issuing Sub CA is up and running.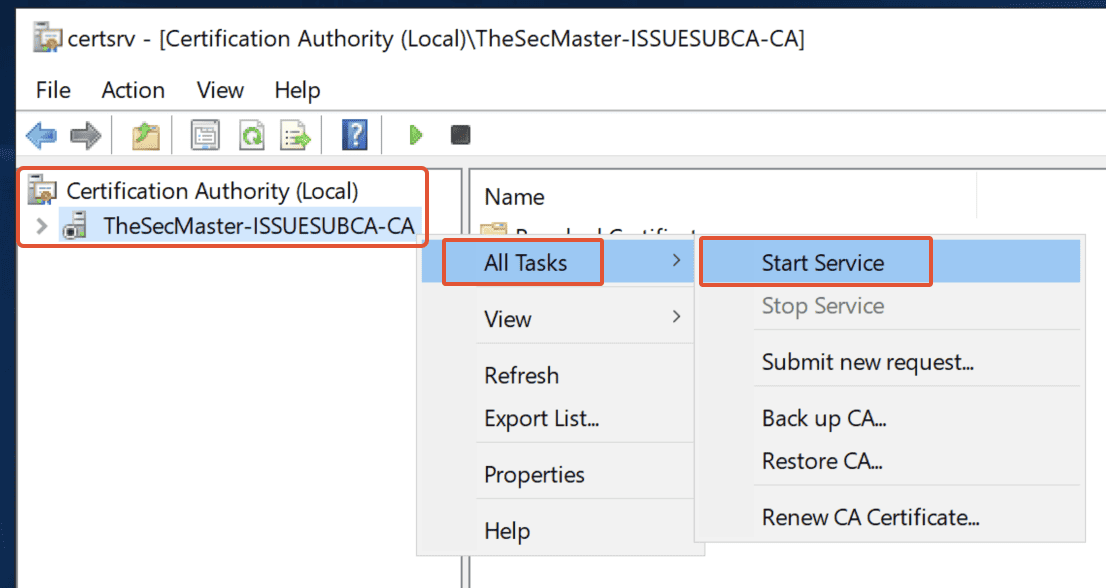
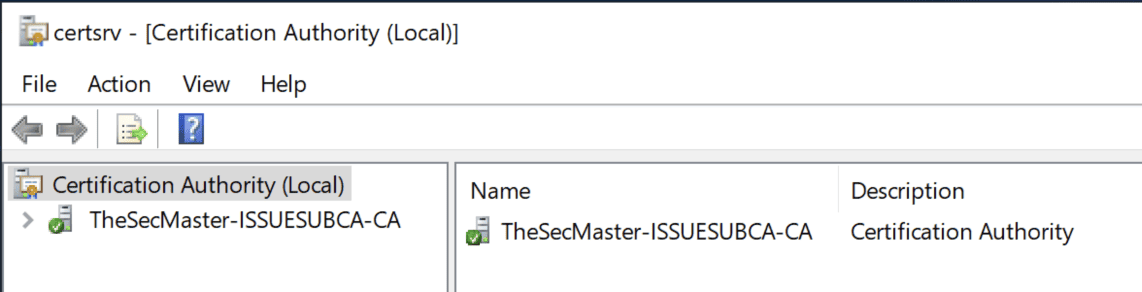
Step 43. Issuing Sub CA is in running state
Step 44. No Certificate Templates published
In the CA console, navigate to Common Name (TheSecMaster-ISSUESUBCA-CA) –> Certificate Templates. No templates exist because we set ‘LoadDefaultTemplates=0‘ in ‘CAPolicy.inf‘ file during pre-configurations of Issuing Sub CA.
Step 45. Add Templates, based on the requirement
To add a Certificate Template, right-click on ‘Certificate Templates‘ –> select ‘New‘ –> click on ‘Certificate Template to issue.’

Step 46. Choose User Template
In this demo, select ‘User’ Template and click on ‘OK.’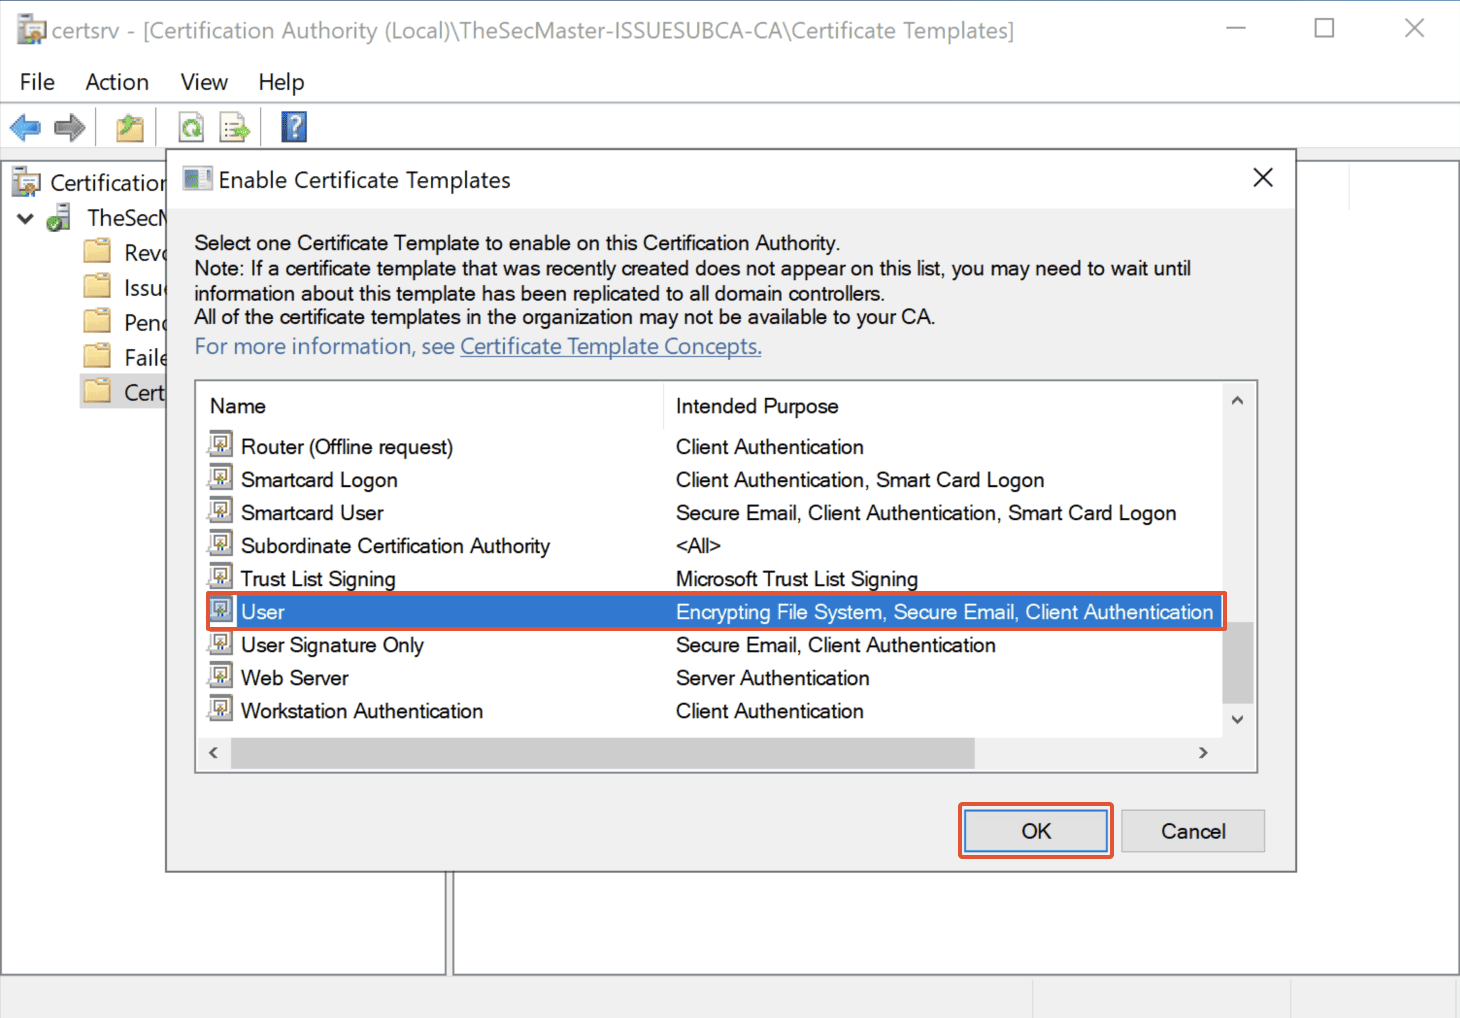
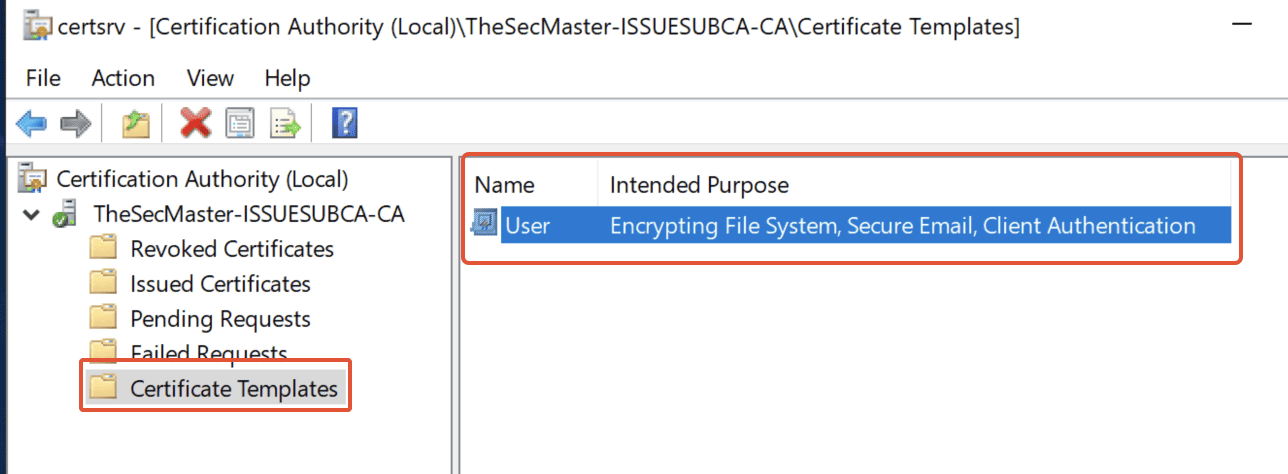
Step 47. User Template has been added to Certificate Templates
Post-Installation Configuration for Issuing Sub CA
1 . Log in to the Enterprise Issuing CA (IssueSubCA.TheSecMaster.local) server as TheSecMaster\Administrator
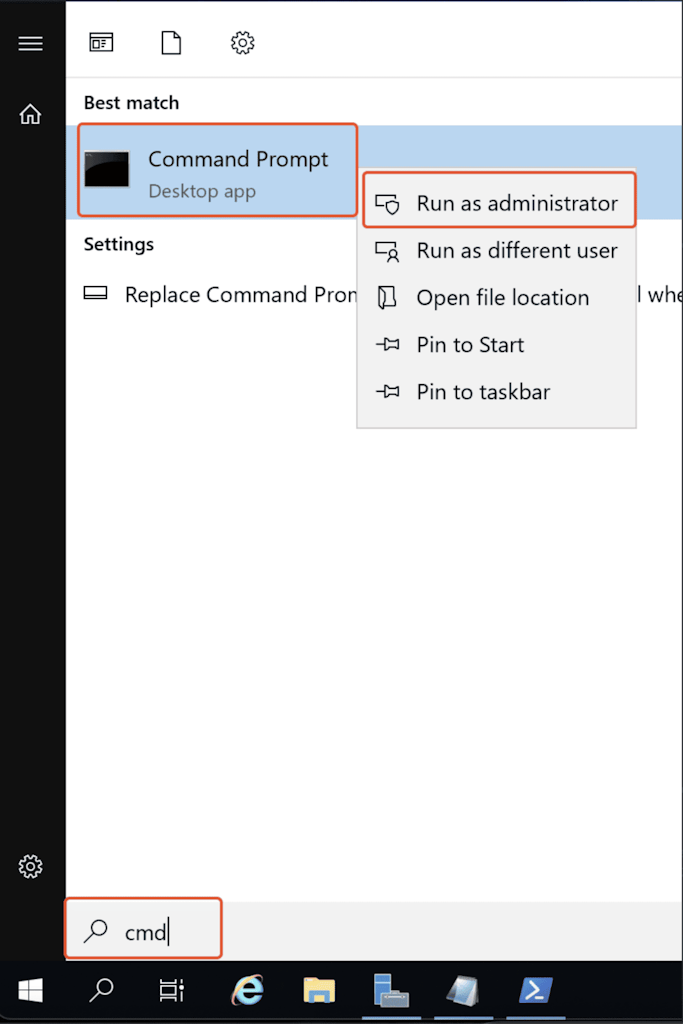
2. Opening Evaluated command prompt:
Follow the below steps to open the evaluated cmd,
Click Start –> type ‘cmd‘, right-click on ‘Command Prompt‘ –> Click on ‘Run as administrator.’
3. Run the below commands to complete the Issuing CA configurations. Run the below commands in the evaluated command prompt:
Note: Restart the certificate service at the end after the completion of the below commands.
1. To configure the CRL and Delta CRL settings
Certutil -setreg CA\CRLPeriodUnits 1
Certutil -setreg CA\CRLPeriod "Weeks"
Certutil -setreg CA\CRLDeltaPeriodUnits 1
Certutil -setreg CA\CRLDeltaPeriod "Days"
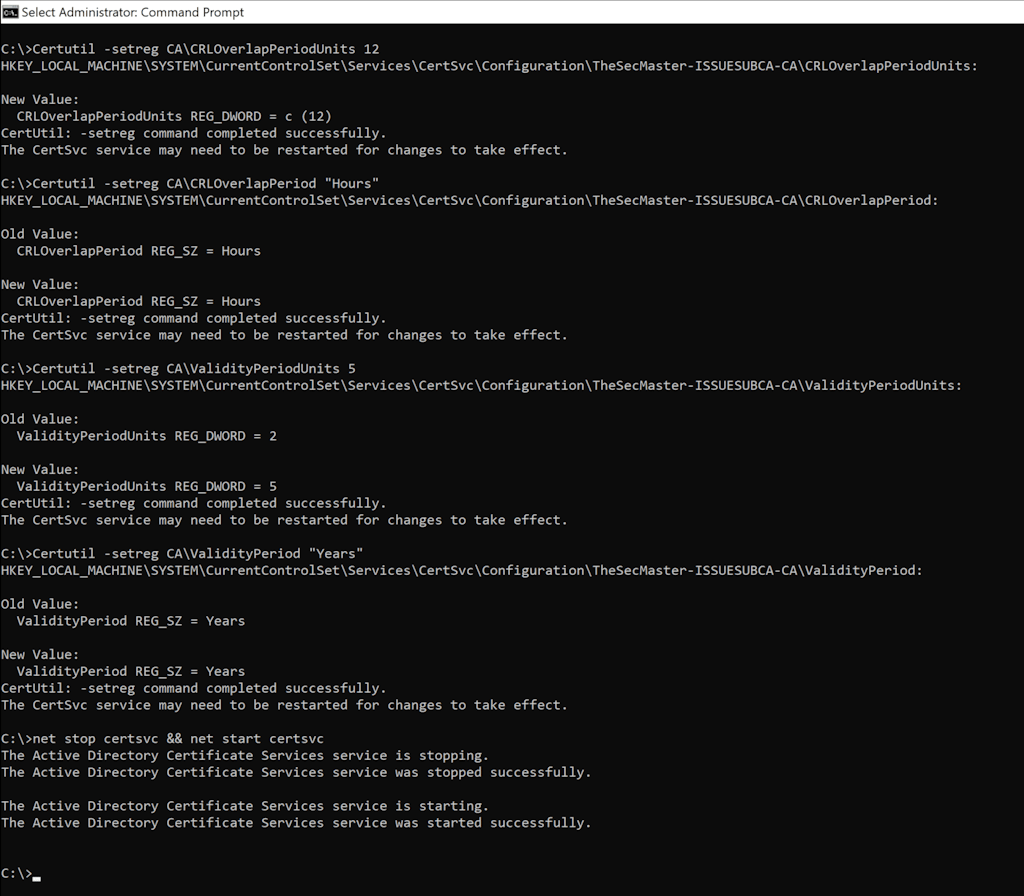
2. To configure the 'CRL Overlap Period Units' and the 'CRL Overlap Period'
Certutil -setreg CA\CRLOverlapPeriodUnits 12
Certutil -setreg CA\CRLOverlapPeriod "Hours"
4. To configure the 'Validity Period Units' for all issued certificates by this CA.
Certutil -setreg CA\ValidityPeriodUnits 5
Certutil -setreg CA\ValidityPeriod "Years"
5. To resetart Certificate Service on the server,
net stop certsvc && net start certsvc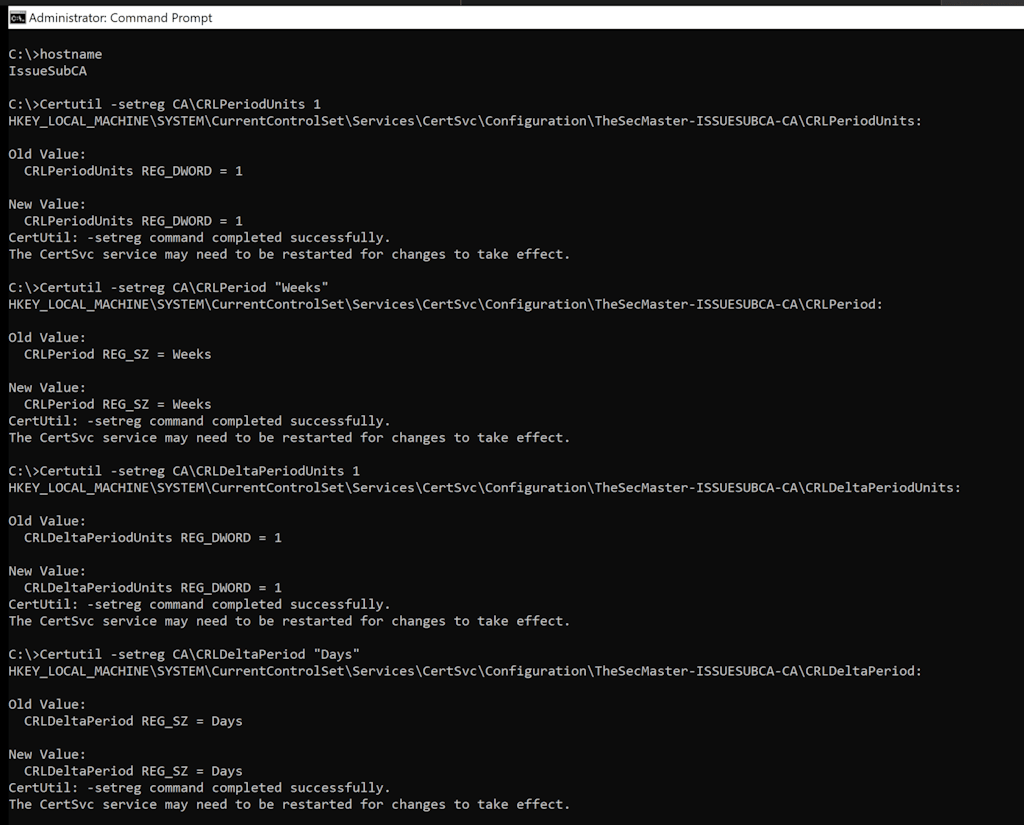
Configuring CDP and AIA using GUI
Similar to the Root CA, it needs to configure CDP and AIA for the issuing CA.
-
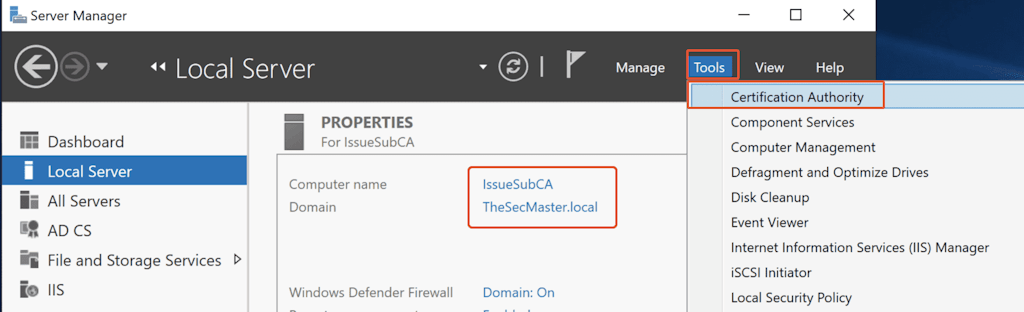
Configuring CDP & AIA in Certification Authority Console
In Server Manager, click on ‘Tools‘ –> select ‘Certification Authority.’
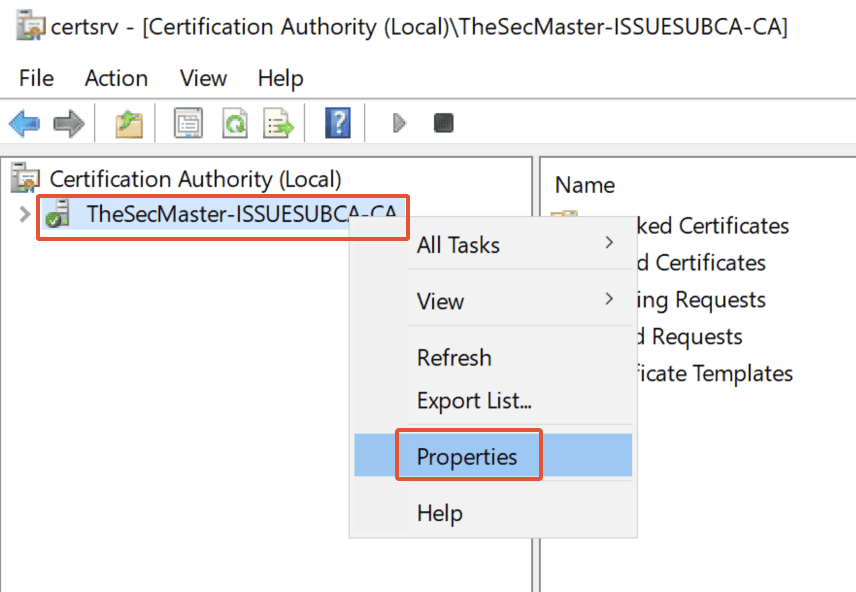
2. Opening Certification Authority properties
In the Certification Authority console, right-click on Certification Authority Name and click-on ‘Properties.’
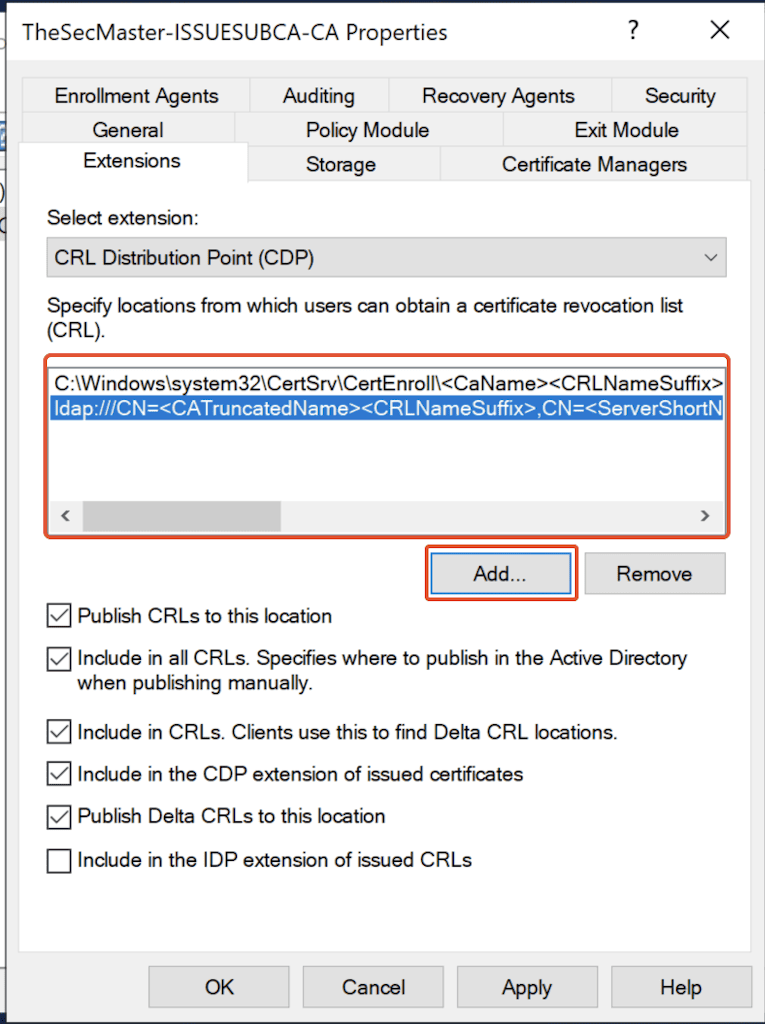
3. Modifying CDP configurations in Certification Authority properties
-
In the Certification Authority Name properties, Select the ‘Extensions’ tab –> Make sure the selected extension is ‘CRL Distribution Point (CDP)’ and Remove the below 2 default CDP Location templates.
http://<ServerDNSName>/CertEnroll/<CaName><CRLNameSuffix><DeltaCRLAllowed>.crl
file://<ServerDNSName>/CertEnroll/<CaName><CRLNameSuffix><DeltaCRLAllowed>.crl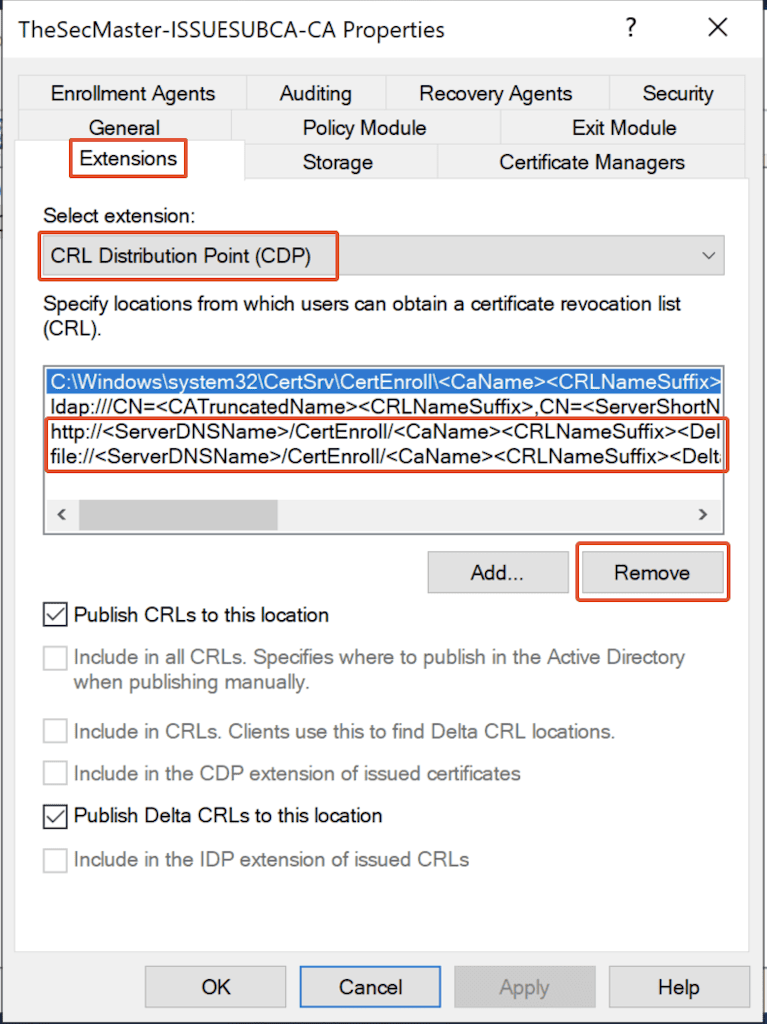
2. After default CDP Location removal, click on ‘Add’ to add a new location.
3. Copy ‘Example location’ from ‘Description of the selected variable’ and Paste in the Location. Replace the ServerDNSName accordingly.
4. In this demo, replace ‘ServerDNSName’ with ‘PKI.thesecmaster.local.’
Sample: http://<ServerDNSName>/CertEnroll/<CaName><CRLNameSuffix><DeltaCRLAllowed>.crl
New Location: http://PKI.thesecmaster.local/CertEnroll/<CaName><CRLNameSuffix><DeltaCRLAllowed>.crl
5. Make sure below 2 options are selected.
-
Include in CRL’s Clients use this to find Delta CRL locations.
-
Include in the CDP extension of issues certificates.
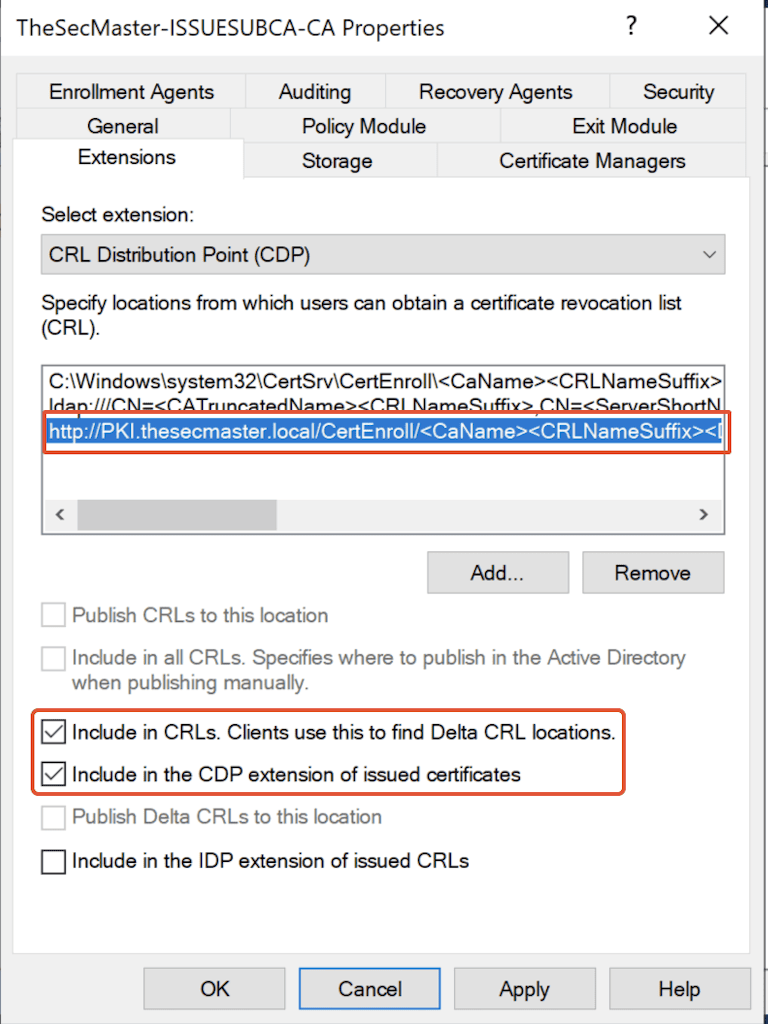
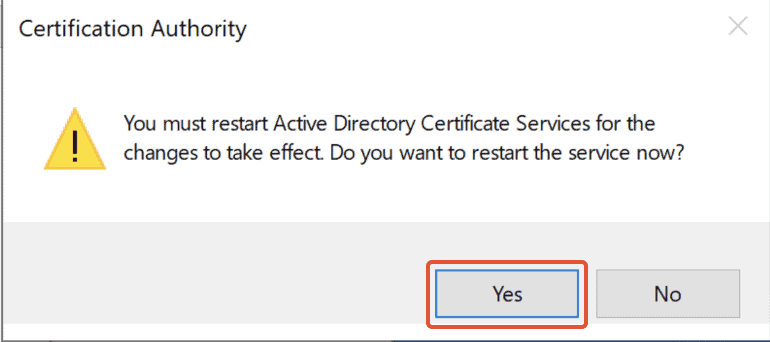
6. Click on ‘Apply‘ and click on ‘Yes’ to restart the certificate services.
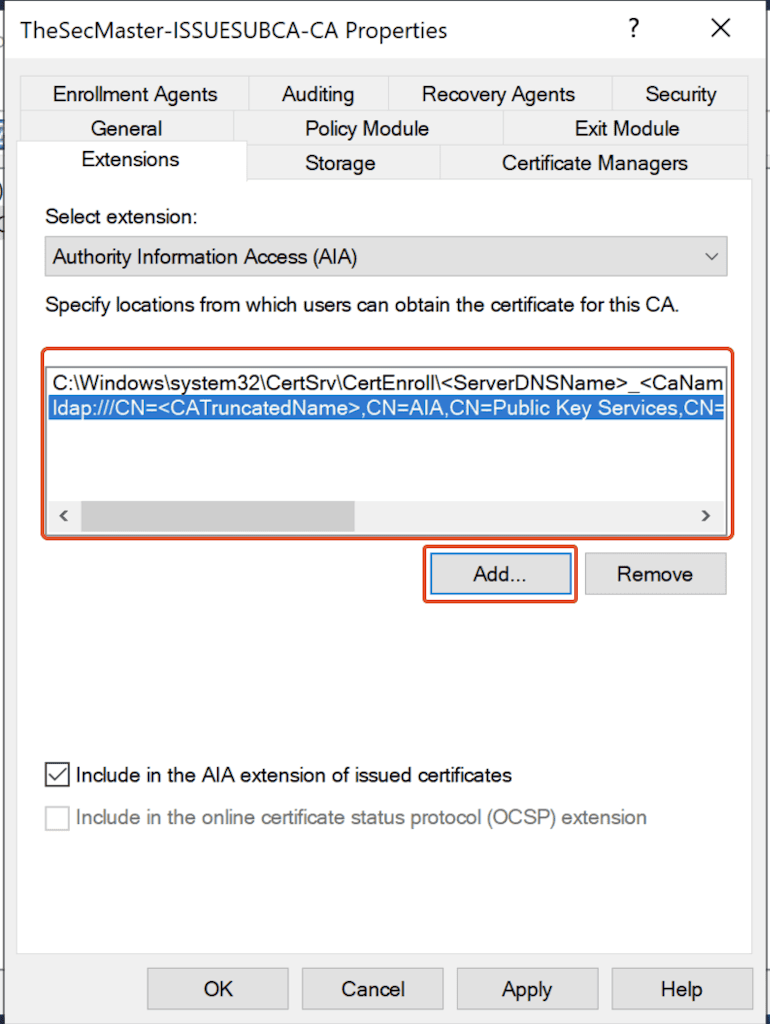
4. Modifying AIA configurations in Certification Authority properties
-
In the Certification Authority Name properties, Select the ‘Extensions’ tab –> Make sure the selected extension is ‘Authority Information Access (AIA)’ and Remove the below 2 default AIA Location templates.
http://<ServerDNSName>/CertEnroll/<ServerDNSName>_<CaName><CertificateName>.crt
file://<ServerDNSName>/CertEnroll/<ServerDNSName>_<CaName><CertificateName>.crt
2. After the default AIA Location removal, click on ‘Add’ to add a new location.
3. Copy ‘Example location‘ from ‘Description of the selected variable‘ and Paste in the Location. Replace the ServerDNSName accordingly.
4. In this demo, replace ‘ServerDNSName’ with ‘PKI.thesecmaster.local.’
http://<ServerDNSName>/CertEnroll/<ServerDNSName>_<CaName><CertificateName>.crt
http://PKI.thesecmaster.local/CertEnroll/<ServerDNSName>_<CaName><CertificateName>.crt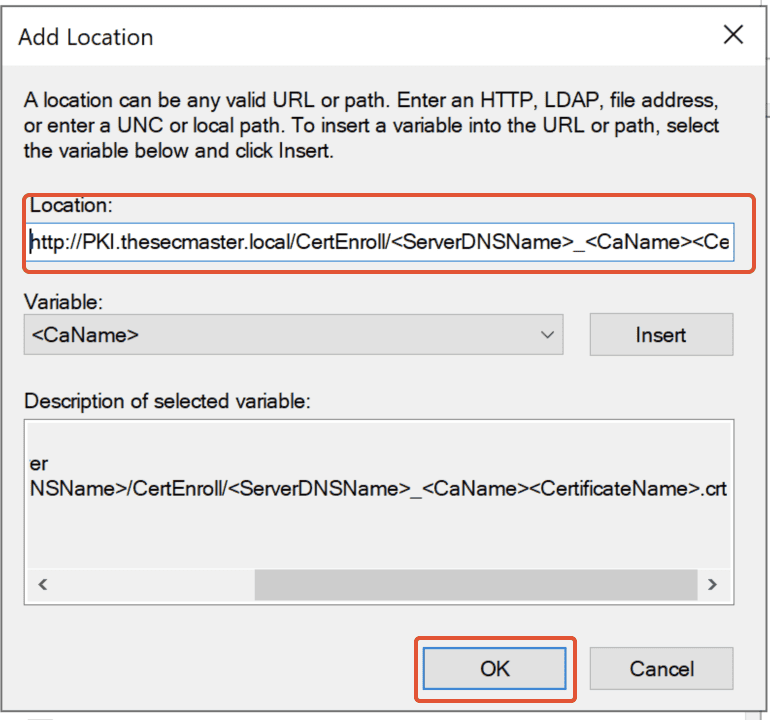
5. Make sure to select ‘Include in the AIA extension of issues certificates.’
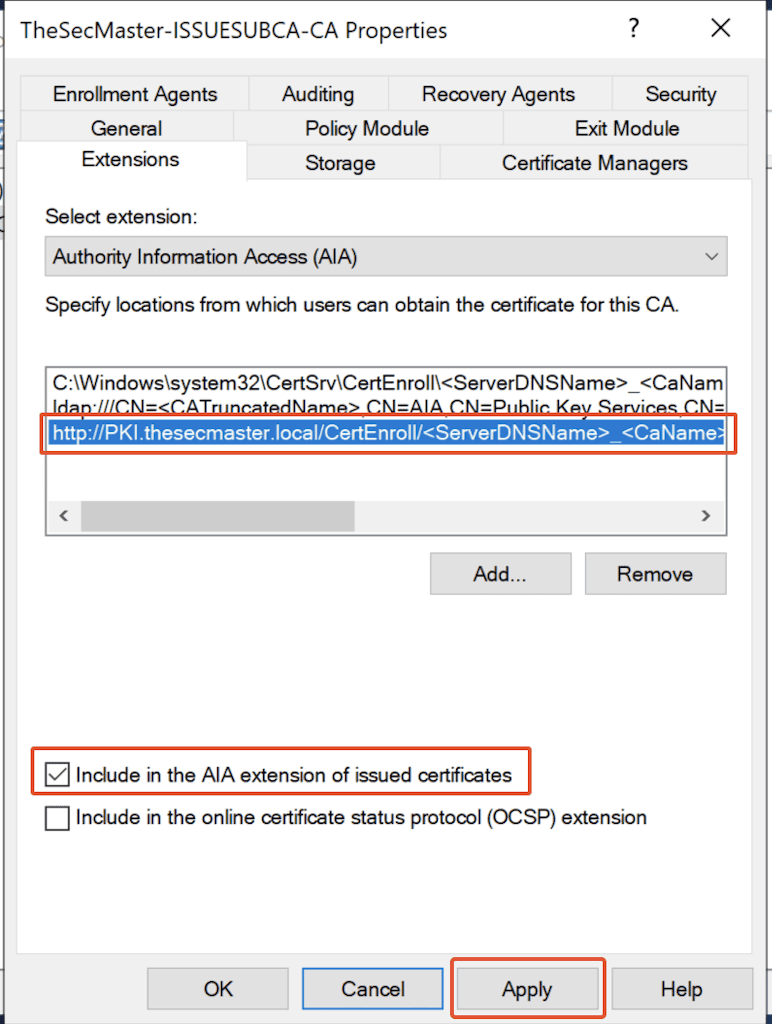
6. Click on ‘Apply‘ and click on ‘Yes‘ to restart the certificate services.
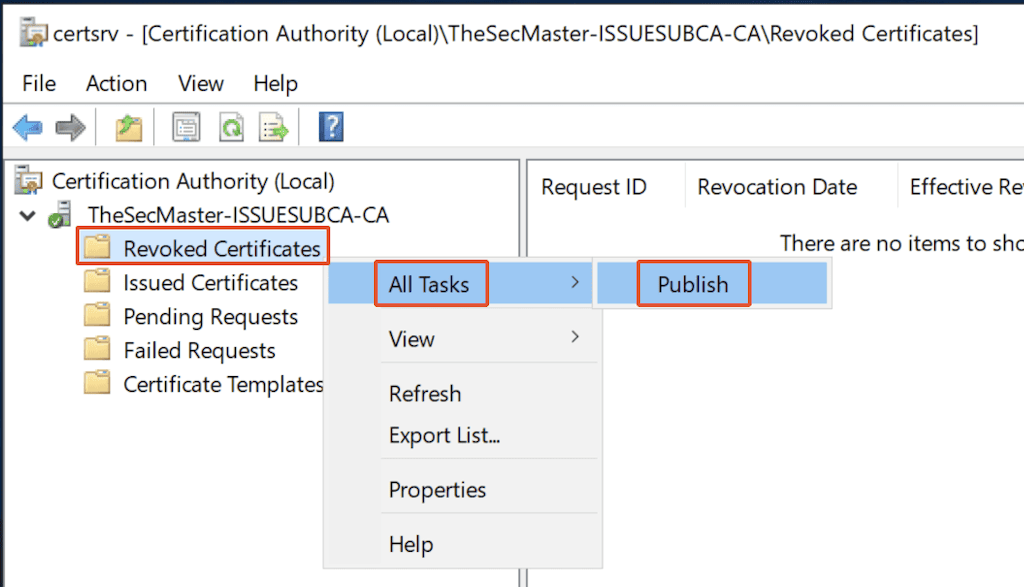
5. Publish New Certificate Revocation List (CRL):
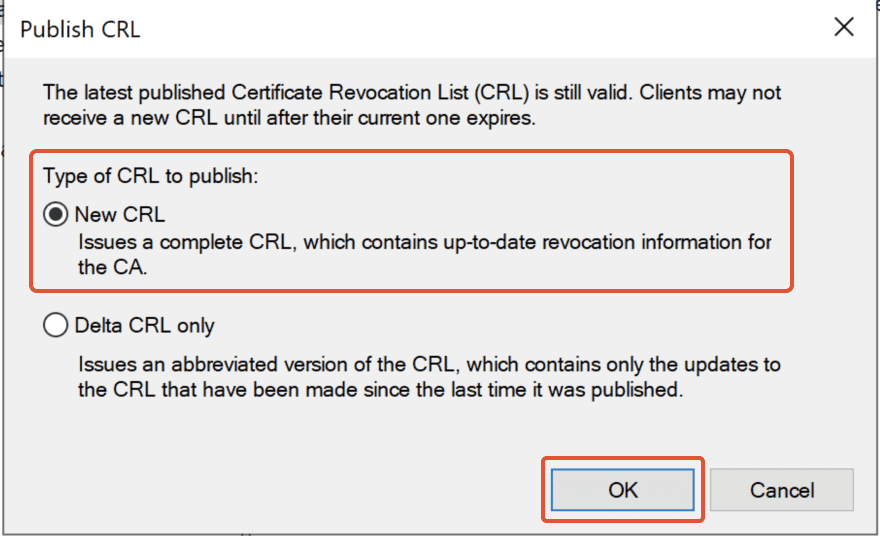
6. Select the type of ‘CRL to publish’
That’s It. The post looks complected, but not really.
We hope this post helps you know how to set up an Enterprise Issuing CA in ADCS.